
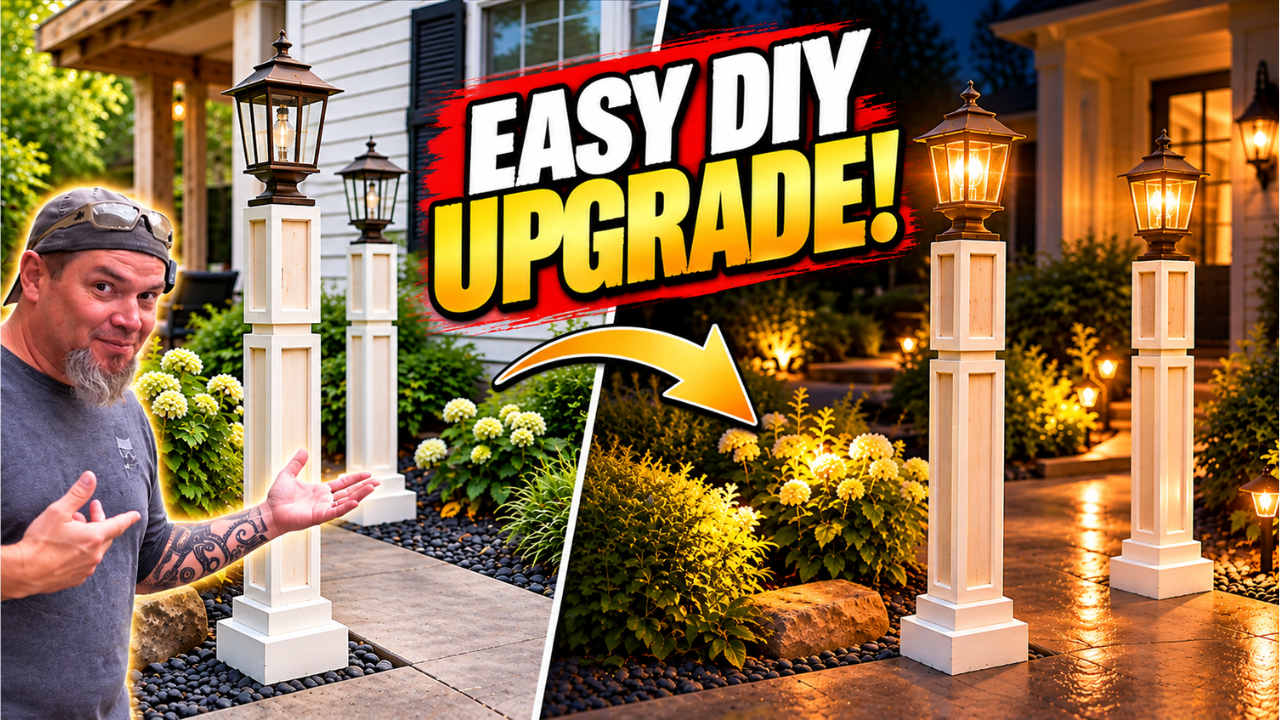
If you're looking for an easy DIY woodworking project that looks amazing, uses affordable materials, and can be decorated for just about any season, I've got a good one for you today!
Recently, my wife showed me a picture of some decorative lamp posts that you can dress up for different holidays and seasons. Now, after being married as long as we have, I knew exactly what that meant. It was her subtle way of saying, "You can either build this, or I'm going to buy it!"
Well, you know me. I'd rather build it!
And I'm glad I did, because this DIY decorative solar lamp post turned out to be one of those simple woodworking projects that looks far more complicated than it actually is.
We're going to use common building materials, add some decorative trim, and top everything off with a solar-powered lantern. No complicated wiring, no expensive specialty materials, and no need for years of woodworking experience.
The finished lamp post is perfect for decorating a front porch, entryway, covered patio, or seasonal display. Paint it white for a clean farmhouse look, stain it for a rustic appearance, or dress it up with ribbons, greenery, and holiday decorations throughout the year.
And the best part? You can build two of these using a lot of the same materials!
So, grab your tools, and let's get our build on!
Materials
4x4 lumber (one 8-foot board makes two approximately 4-foot posts)
1x6 lumber or fence pickets for the decorative base
2x4 lumber for the bottom base trim
Solar-powered post-top lantern
Wood Glue
Brad Nails
2½-inch Wood Screws
Wooden Dowels
Wood Filler
Exterior-appropriate Paint or Stain
Tools
Miter Saw
Table Saw
Thin-Rip Jig (optional)
Brad Nailer
Drill and Countersink Bit
Palm Sander
Clamps
Step 1: Cut and Prepare the 4x4 Post
We're going to start with the main structure of our lamp post, and that couldn't be much simpler.
Take your 8-foot 4x4 and cut it in half to create two approximately 4-foot posts. I also like to trim the ends so they're nice and square. The 4x4 is going to be the center of our entire project. Everything else, including our layered base and decorative trim, will attach directly to it.
Before continuing, make sure the post is reasonably straight, stands squarely, and doesn't have any major defects. Once that's done, we're ready to start building the decorative base.
Step 2: Build the First Two Layers of the Decorative Base
Now we're getting into the part of the project that really gives this lamp post its character. Instead of simply attaching a flat piece of wood to the bottom, I designed a three-layer decorative base that adds dimension and makes the finished project look much more substantial.
First base layer
For the first layer, we're using 1x6 lumber.
Cut four pieces with the following dimensions:
Length: 5 inches, measured from miter tip to miter tip
Miter angle: 45 degrees on both ends
You can make these cuts using your miter saw with the boards standing on edge or by laying them flat and cutting a 45-degree bevel, depending on your setup.
Next, measure 6½ inches up from the bottom of your 4x4 and mark a line on all four sides. These marks establish the top position of your first layer. Apply wood glue and position each trim piece around the post, keeping the top edges aligned with your marks. Secure them using brad nails.
The four pieces create a mitered surround around the bottom of the post. Once they're attached, lightly sand the exposed edges with a palm sander.
Second base layer
Now we're going to add another layer directly over the first. Using the same 1x6 material, cut four more pieces:
Length: 6½ inches, measured from tip to tip
Miter angle: 45 degrees on both ends
These pieces are longer than the first set, allowing them to project outward and create that stepped, layered appearance. Position the second layer around the post with its bottom edges resting evenly against your work surface. Attach everything using wood glue and brad nails, just like we did with the first layer.
Don't worry if you have a little bit of overhang at the mitered corners. We can sand those edges down later. At this point, you should have two decorative layers around the bottom of your 4x4.
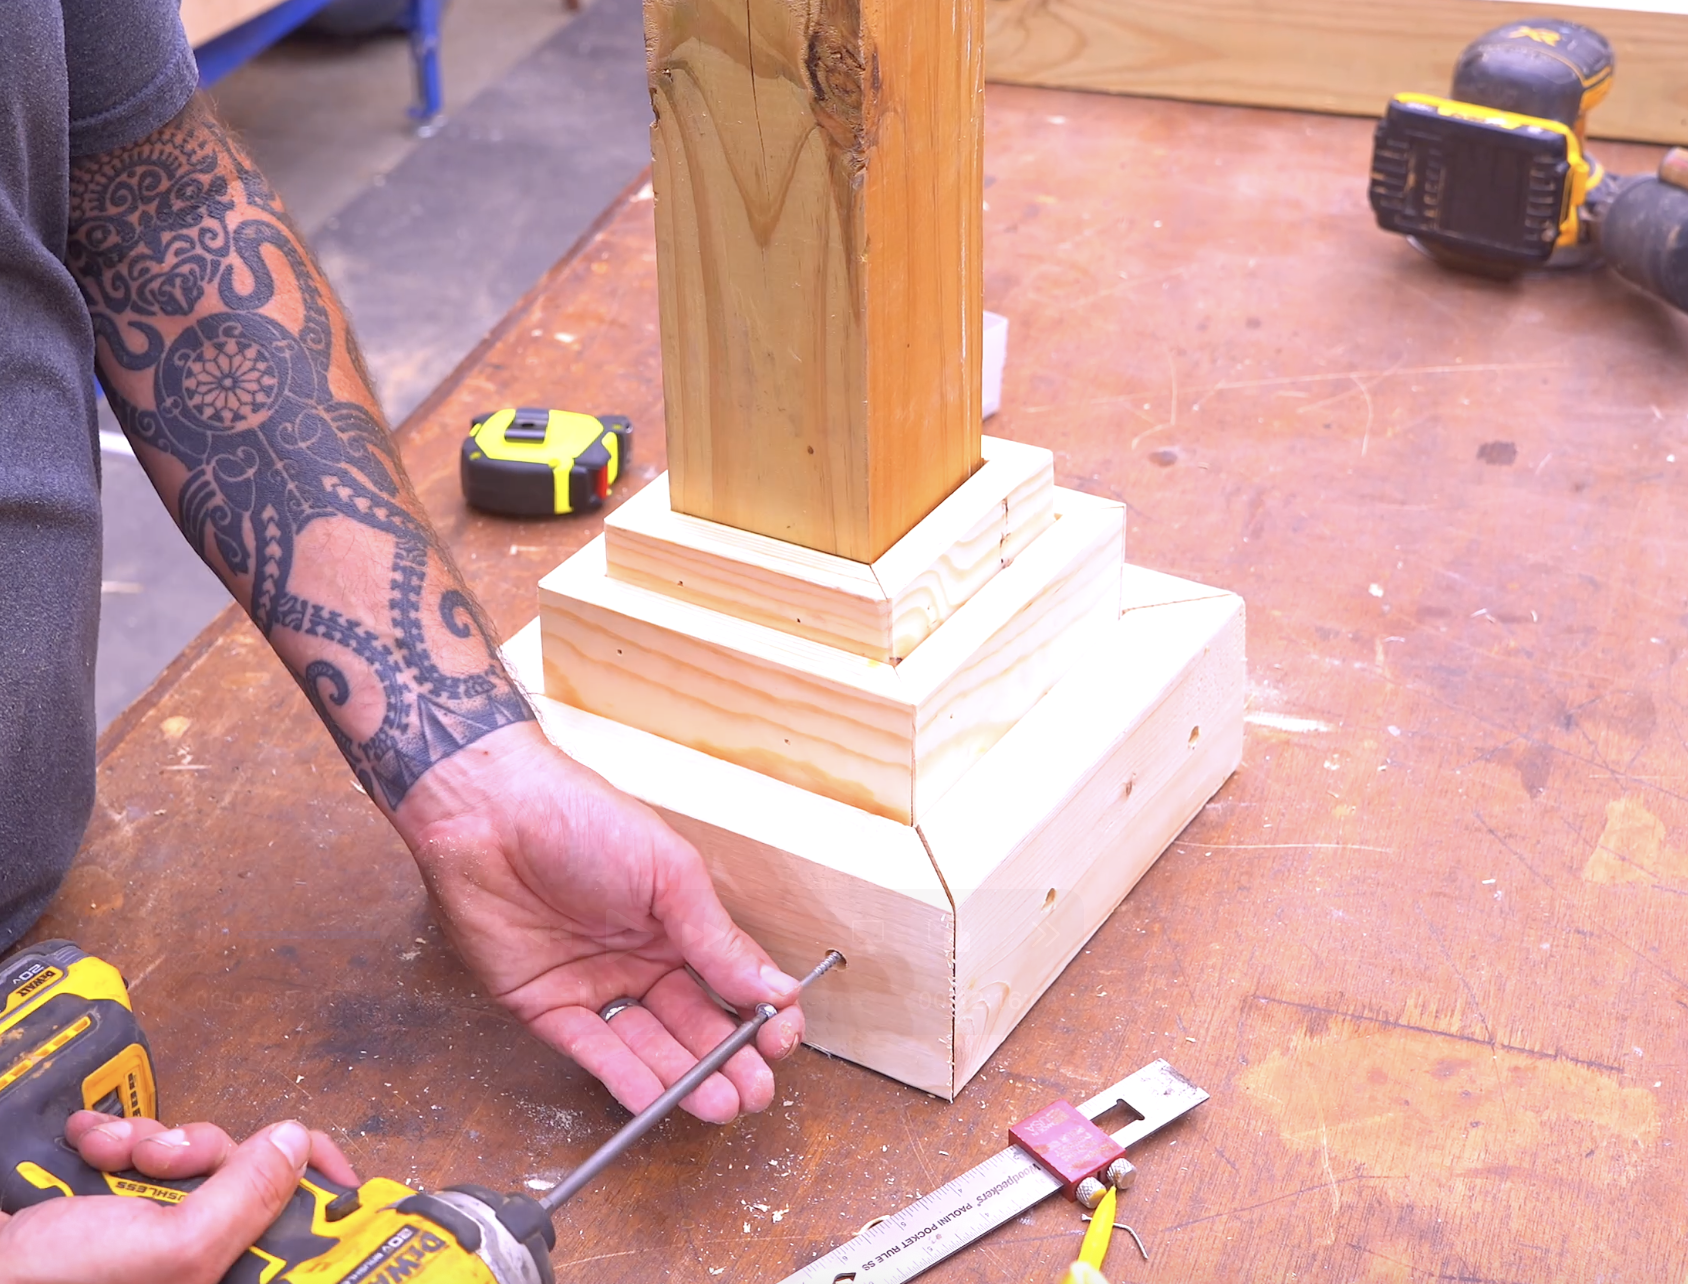
Step 3: Add the Third Base Layer and Secure Everything
For our final base layer, we're switching to 2x4 material. This thicker lumber helps give the bottom of the lamp post a heavier, more finished appearance.
Cut the following pieces:
Length: 9½ inches, measured from tip to tip
Miter angle: 45 degrees on both ends
Quantity: 4 pieces
Arrange the four boards around the bottom of the existing base, creating the final outer layer. Unlike the first two layers, I'm going to secure these pieces with screws.
Attaching the bottom trim
First, countersink two holes in each of the four boards. These holes allow the screw heads to sit below the surface so we can cover them later. Secure the boards using 2½-inch wood screws, checking that everything is aligned as you work around the base.
Once all four pieces are attached, cut small plugs from 3/8-inch wooden dowels and use them to cover the countersunk holes. Apply wood filler wherever it's needed, including small gaps in the miter joints. Don't get frustrated if every corner isn't absolutely perfect. Dimensional lumber isn't always perfectly straight or consistent, and small imperfections can be addressed before painting.
Once the filler has dried, sand the entire base until the surfaces are smooth and the transitions look clean. Now we've got a sturdy-looking three-layer decorative base!
One important thing to remember is that this is a decorative, freestanding design. Before displaying it, make sure the finished post is stable and secure it against tipping where needed, especially outdoors or around children and pets.
Step 4: Cut the Decorative Trim Strips
Now we're going to take our lamp post from something that looks like a 4x4 sitting in a decorative base to something that looks like a professionally finished piece of outdoor décor.
Preparing the trim
Using your table saw, cut strips approximately 3/8 inch wide. You can adjust your table saw fence between cuts, or use a thin-rip jig to make repeatable strips. Once your strips are cut, adjust the saw blade to 45 degrees and bevel one long edge of each strip. That angled edge is important because two strips will eventually come together to form decorative corners around our 4x4.
We're essentially creating our own custom trim, which is one of my favorite ways to dress up a project without buying expensive specialty molding.
Decorative trim cut list
Here's what you'll need for one lamp post:
8 pieces at 26” for the Lower Box Vertical Trim
16 pieces at 4 1/4” for the Horizontal Trim
8 pieces at 13 1/2” for the Upper Box Vertical Trim
All these pieces need 45-degree miters on their ends, measured from tip to tip.
When cutting the miters, keep the beveled long edge oriented consistently. The shorter side of each end miter should be on the flat side of the trim.
Before cutting all your pieces, make a test corner using two short scraps. The long-edge bevels should meet neatly when placed around a corner of your 4x4. Once you've confirmed the profile is correct, cut the rest of your pieces.
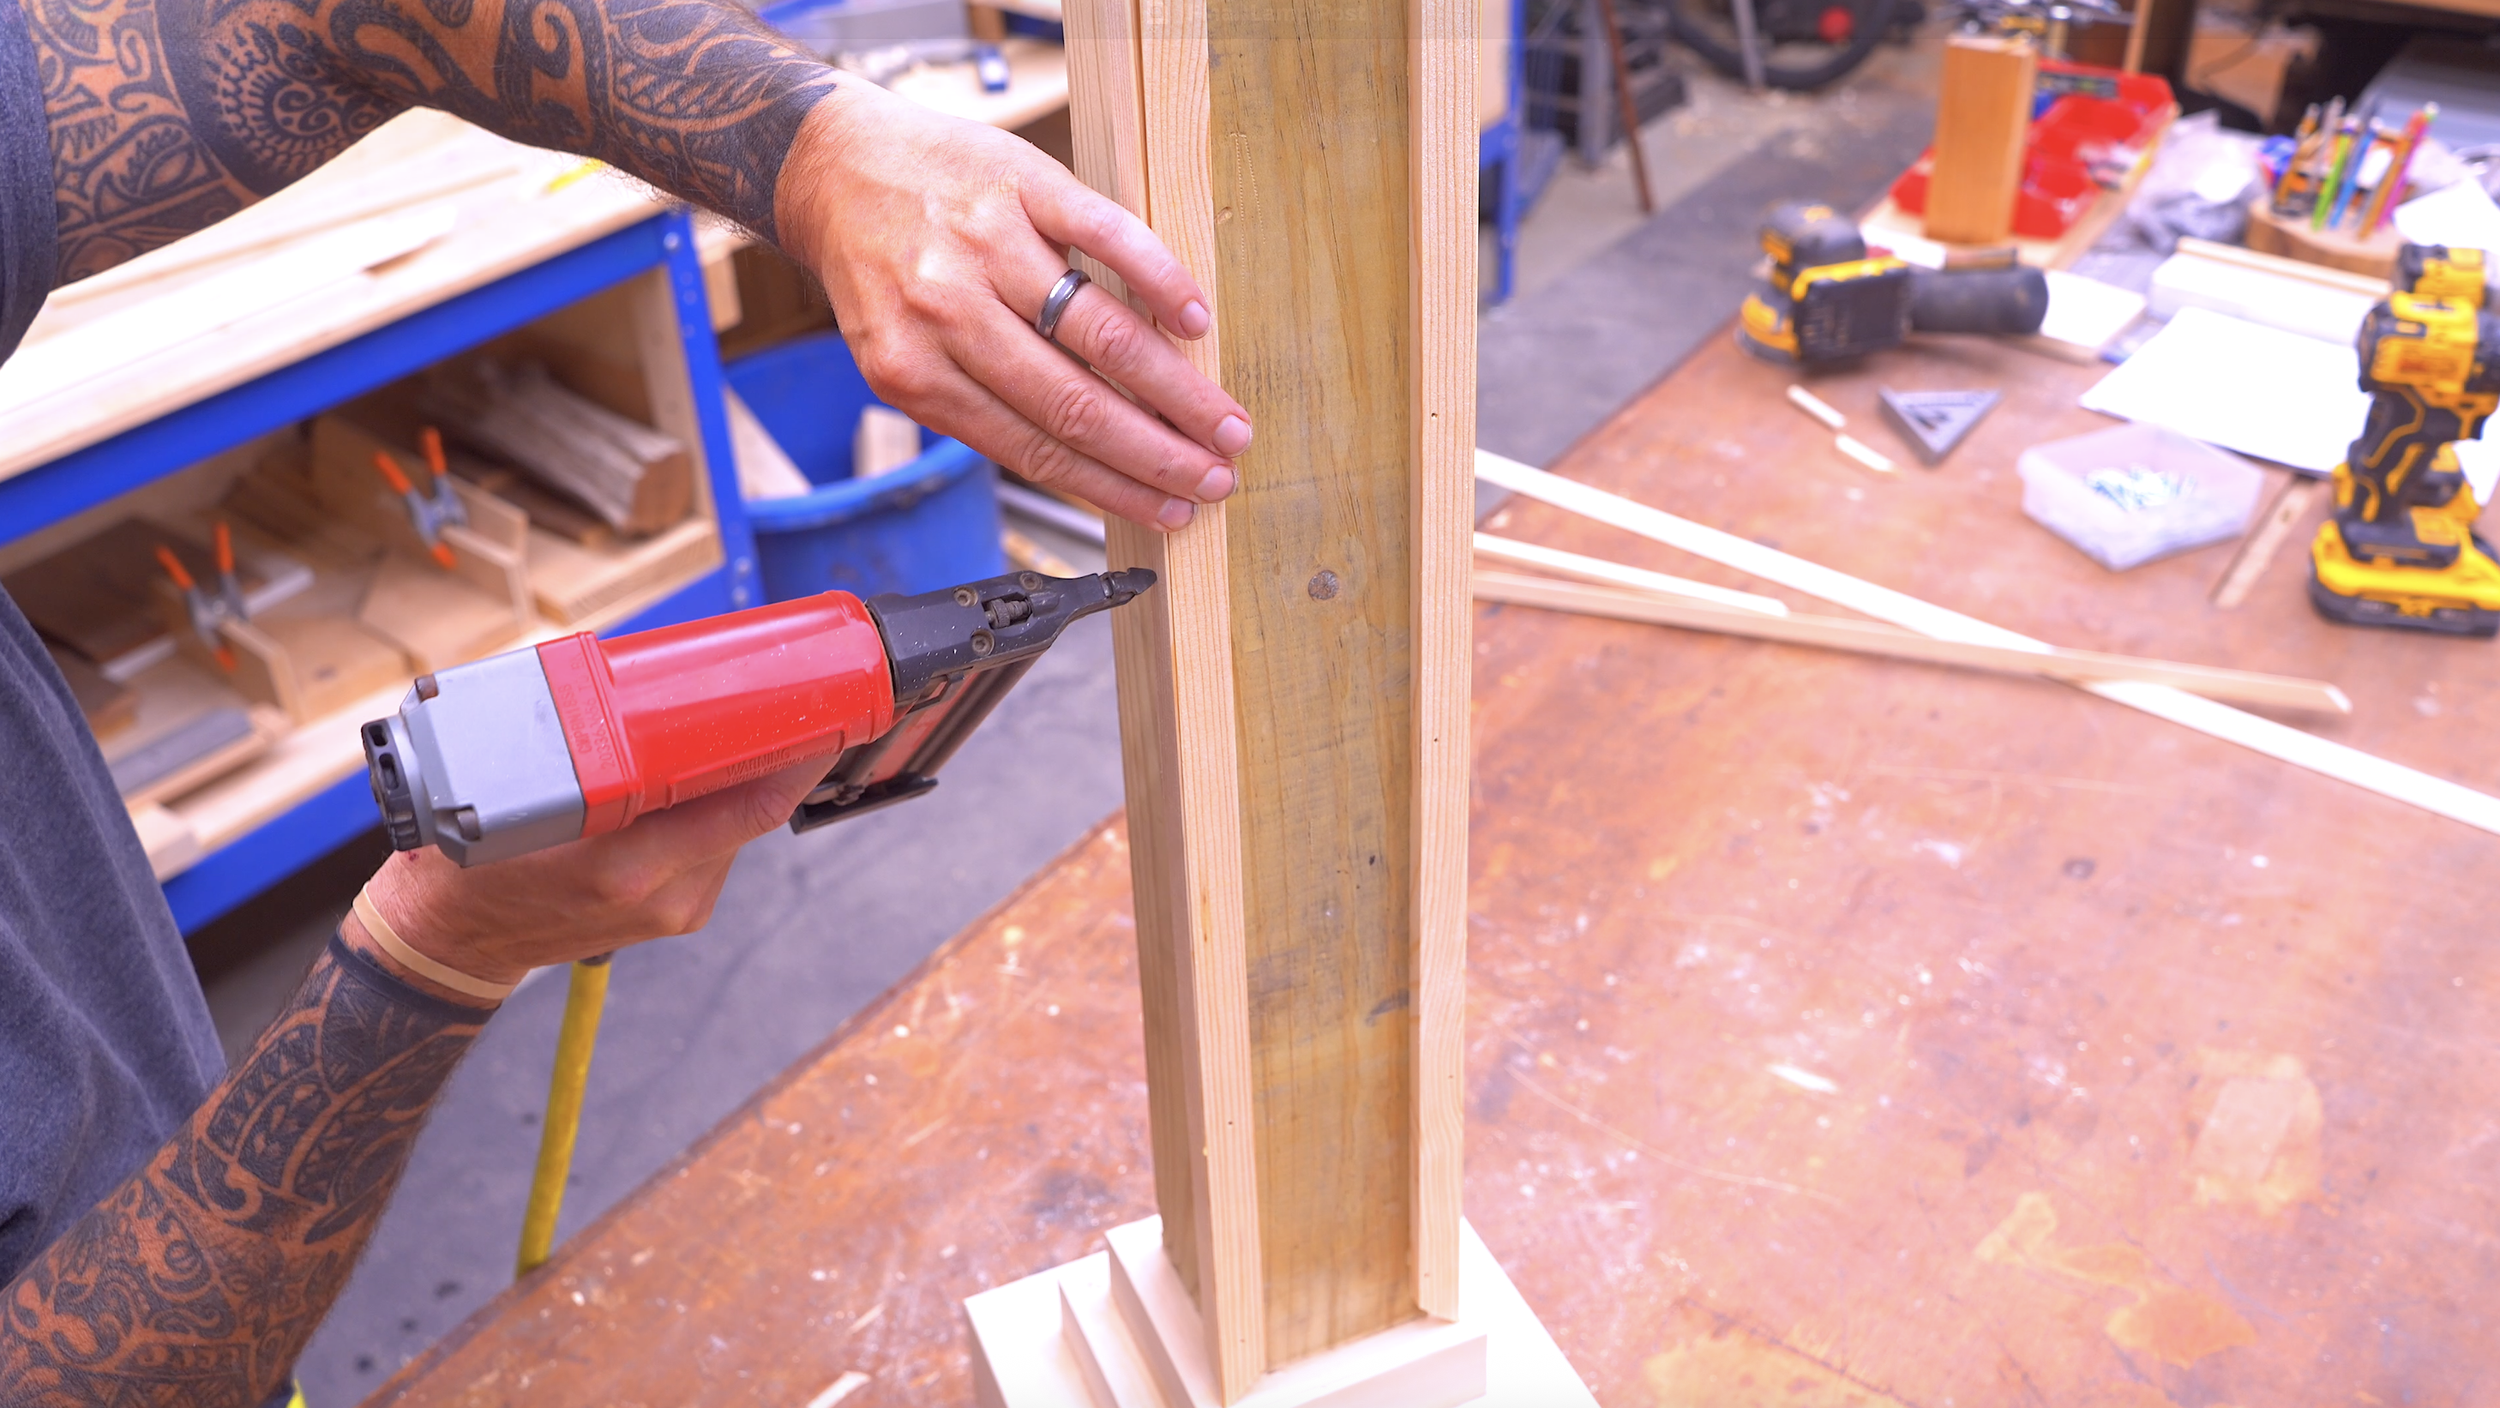
Step 5: Install the Lower Decorative Trim Boxes
With our trim strips cut and ready, it's time to start attaching them to the lamp post. We're going to create framed decorative panels on each of the four sides.
Attaching the Long Vertical Trim
Start with your eight 26-inch pieces.
Each corner of the 4x4 will receive two trim strips, with their beveled long edges meeting to form a finished outside corner. Apply wood glue to the backs of the strips and position them around the post. The bottom ends should rest against the top of your decorative base.
Secure the pieces using brad nails. Continue around the post until all eight vertical pieces are installed. You should now have four sides framed by the longer vertical trim pieces.
Adding the Horizontal Trim
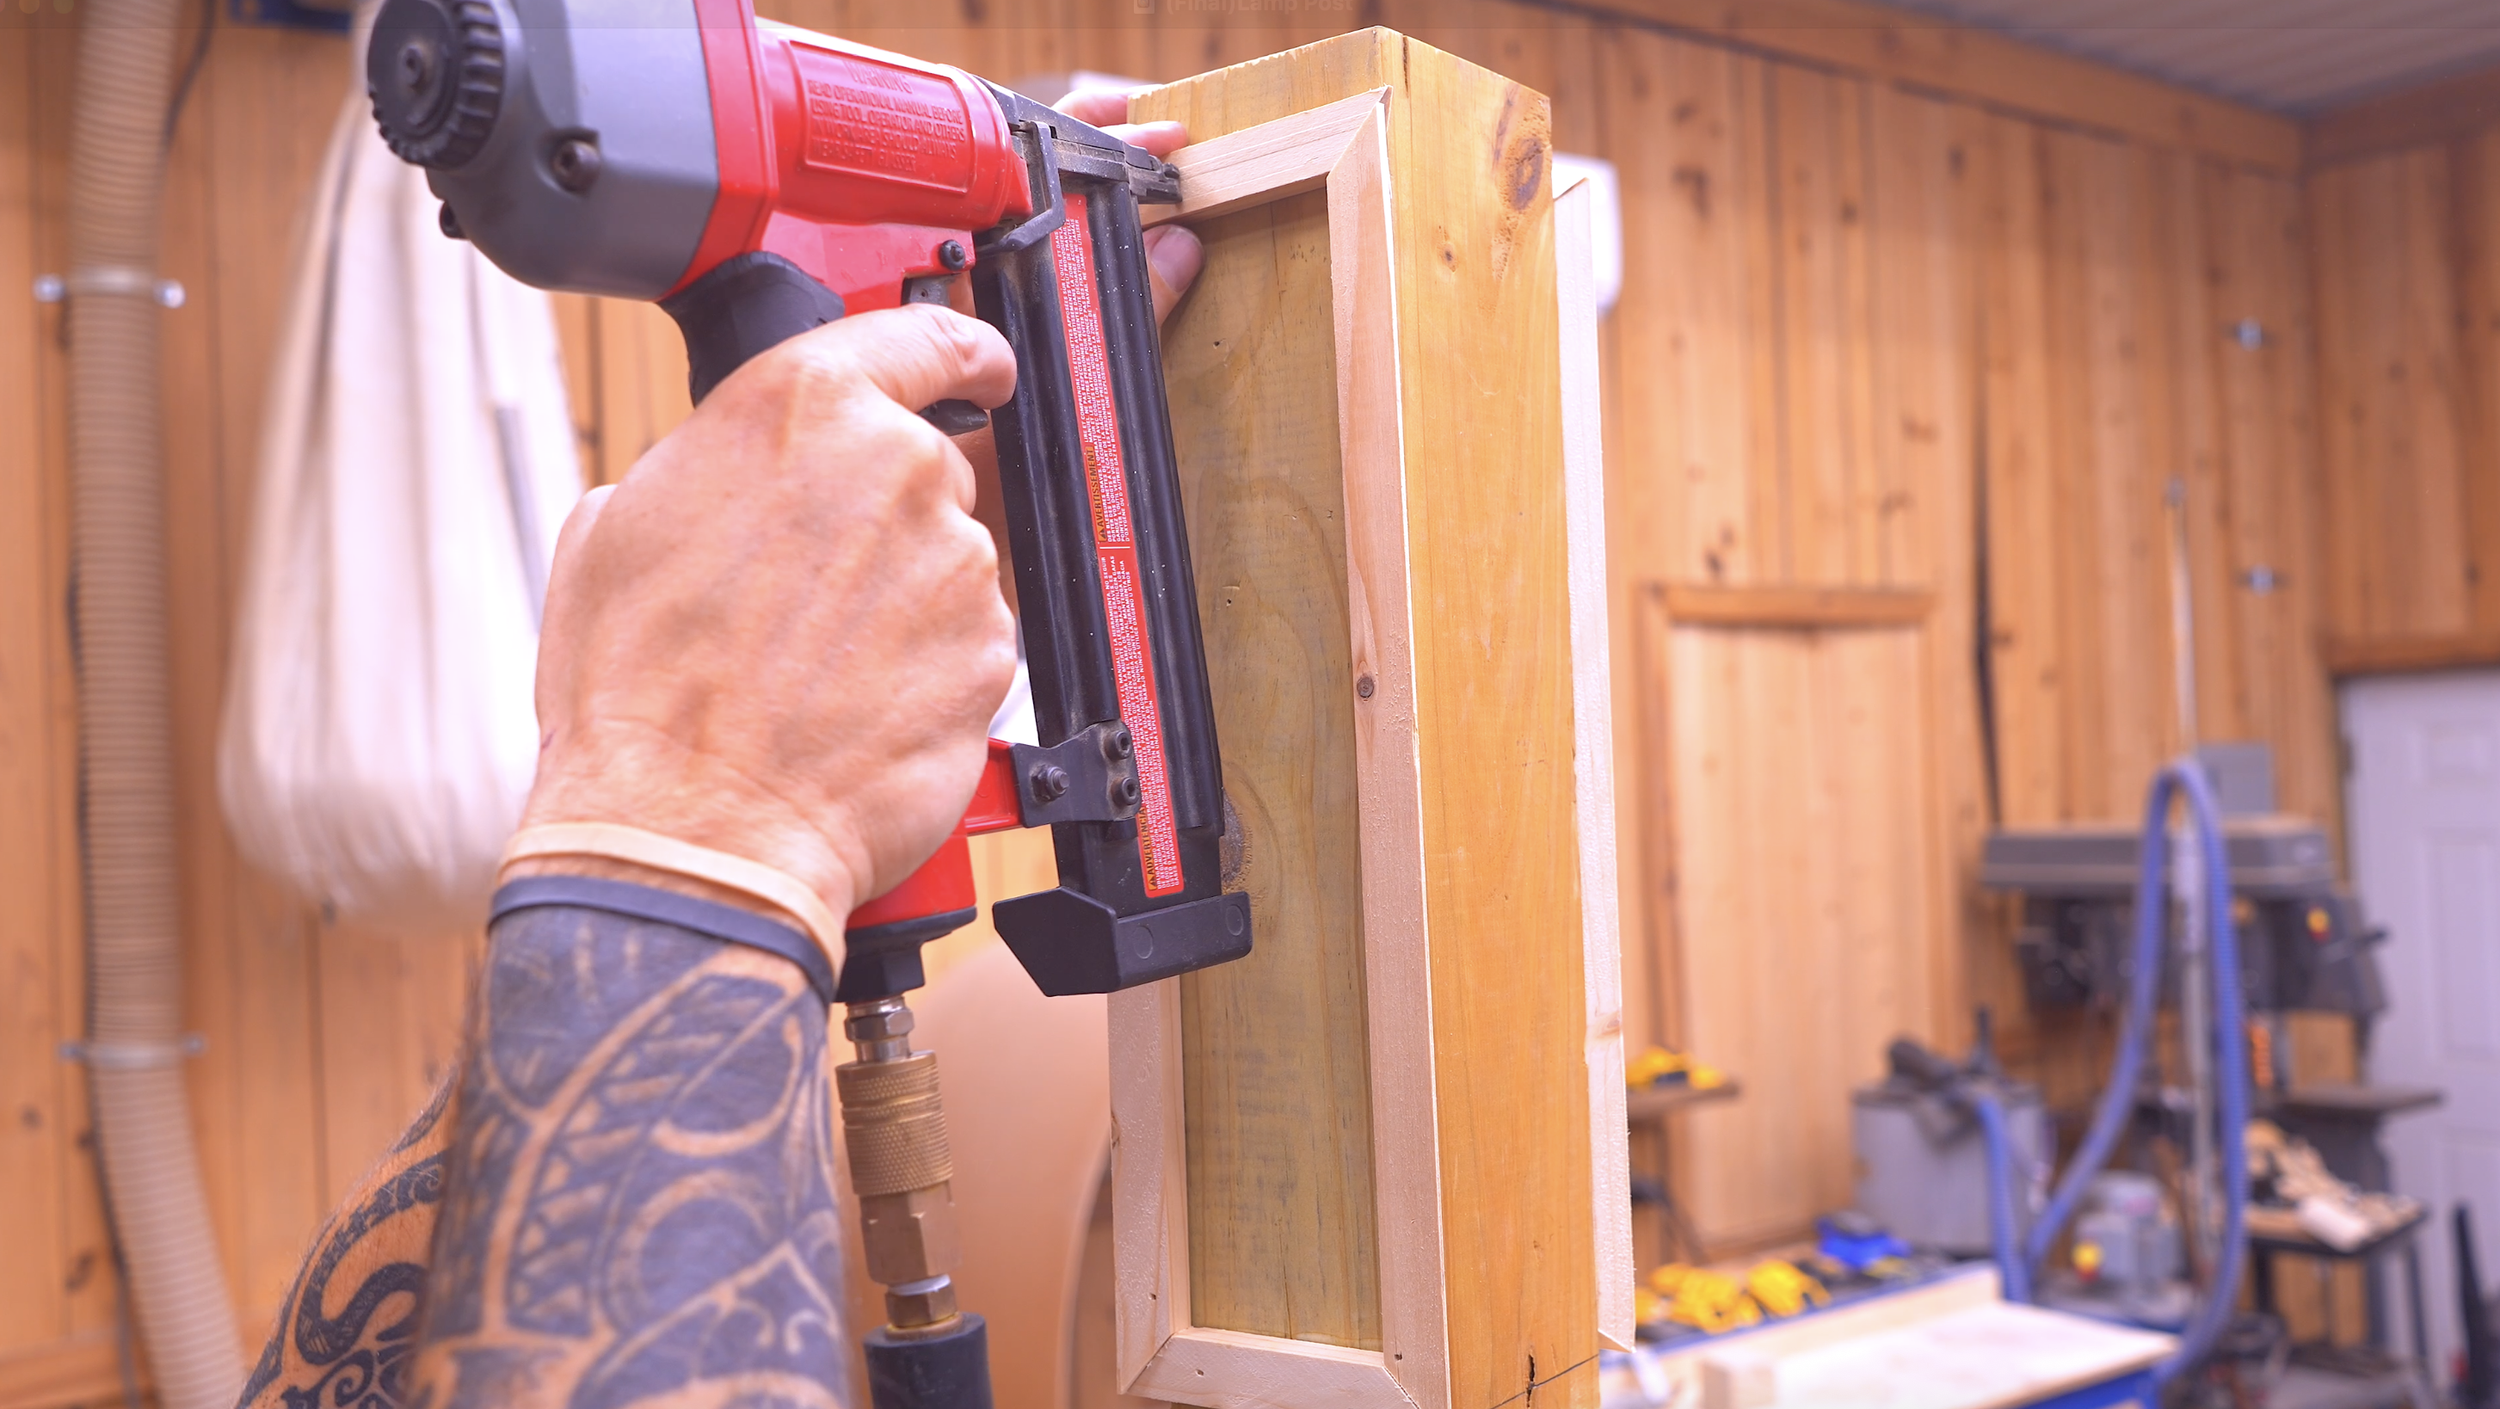
Next, take eight of your 4¼-inch horizontal trim pieces. These will create the top and bottom borders of our lower decorative boxes.
Position one horizontal piece near the top and one at the bottom of each side, fitting their 45-degree miters against the vertical trim. Attach them using wood glue and brad nails. Work your way around all four sides.
If one of the bottom horizontal pieces fits a little tightly, don't force it directly with a hammer. Use a scrap piece of wood to gently tap it into place without damaging the decorative edge.
By the time you've completed this step, you'll have four long, rectangular decorative panels around the lower portion of your lamp post. And this is where the project really starts looking good!
Step 6: Build the Upper Decorative Trim Boxes
Now we're going to repeat the same basic process at the upper portion of the post. The difference is that these upper decorative boxes are shorter, which gives our finished lamp post a nice balanced appearance.
For these boxes, you'll use:
Eight vertical pieces measuring 13½ inches
The eight remaining horizontal pieces measuring 4¼ inches
Positioning the Upper Boxes
I wanted a small gap between the upper and lower decorative boxes to break up the design. In my build, I measured down 14½ inches from the top of the post to establish the bottom of the upper decorative boxes.
Start by attaching the lower horizontal pieces at the appropriate position on each side. Then attach the 13½-inch vertical pieces, followed by the remaining horizontal pieces across the tops. Just as before, use wood glue and brad nails to secure everything. Make sure the mitered corners line up neatly and the spacing is consistent across all four sides.
Once everything is installed, you'll have a pair of vertically arranged decorative boxes on each side of the post. That gives you the dimensional, paneled look that makes this build stand out from a plain wooden post.
Now all that's left is the finishing work and the solar lamp!
Step 7: Sand, Paint, and Install the Solar Lamp
At this stage, inspect the entire lamp post for rough edges, exposed nail holes, small gaps, or anything else that needs attention. Use wood filler where necessary, allow it to dry, and sand the surfaces smooth. Pay special attention to the corners of your decorative trim and the transitions between the three base layers.
Choosing your finish
You can finish this project just about any way you'd like. For my build, I originally considered staining the wood. But after checking with my wife, we decided to go with white paint. And I have to say, I think that was a great choice!
The white finish really brings out the raised trim and gives the post a clean farmhouse-style appearance. If you're planning to use yours outside, choose paint or stain suitable for exterior wood, and follow the manufacturer's preparation and drying instructions.
Installing the Solar-Powered Lamp
One of the coolest things about this project is that we're using a solar-powered lantern. That means no electrical wiring, no extension cords, and no complicated installation.
The particular style I used has a base that slips over the top of the 4x4, with mounting holes on the sides.
To install it:
Position the solar lamp over the top of the finished post.
Make sure it's centered and seated correctly.
Secure it through the mounting holes using the appropriate screws.
Activate the lamp according to its manufacturer's instructions.
Make sure the lantern you select is compatible with your post dimensions and approved for the location where you'll use it. Also, remember that the solar panel needs sufficient sunlight to charge properly.
And just like that, we've transformed basic lumber into a beautiful decorative solar lamp post!

Ready to Build?
We started with a basic 4x4, added a three-layer decorative base, framed the sides using homemade trim, and finished everything off with a solar-powered lantern. Nothing overly complicated, but the finished result has plenty of character. And since so much of the material can be used to create two lamp posts, building a matching pair makes a lot of sense.
Whether you're decorating your front porch, creating seasonal displays, or simply looking for your next DIY project, I think you'll really enjoy this one. My goal is always to make woodworking approachable, enjoyable, and something you can be proud of. So, what are you waiting for?
👉 Get up, get out, and get your build on.
Whether you’re new to woodworking or a seasoned pro, this project offers the perfect mix of functionality and creativity. Below I have the YouTube video linked for a step-by-step video tutorial for you to follow along with. If you’re a more “plans in the hand” person, click “Get Plan” down below for downloadable instructions. And if you’re ready to dive deeper into woodworking, check out my new course, “Woodworking Kickstart” (which is also linked below). It’s packed with step-by-step lessons to help you build confidence and skills, whether you’re a total beginner or an experienced DIYer. You’ll be building with confidence in no time.
Remember, creativity doesn’t have to be expensive; all you need is a little inspiration and a willingness to try.
Get Easy Step-By-Step Directions to build this by clicking the button below
⭐ 10,044 5 Star Reviews
📚 113 Plans to Choose From
🧩 Lego-Like Assembly Steps
📏 Exact Measurements
📋 Detailed cut and part list
🔍 X-Ray Views
🚀 Instant Delivery
