
5 Small Woodworking Projects That Could Make You Money
If you've followed my Smalls That Sell series, you know I'm always looking for woodworking projects that make me stop and think.
I'm always looking around big-box stores and online for woodworking projects that catch my attention. Sometimes it's the price tag. Sometimes it's a unique design. And sometimes I see something so simple that I immediately think:
Why aren't we making these?
I want to know why people are buying it, what makes it different, and whether we can make our own version without spending a fortune on materials.
And that's exactly what we're doing today.
Project 1: Rustic Farmer's Market Crate
Okay, so this first one caught my attention because it's basically a combination of two things that people already love.
Wooden crates and decorative baskets.
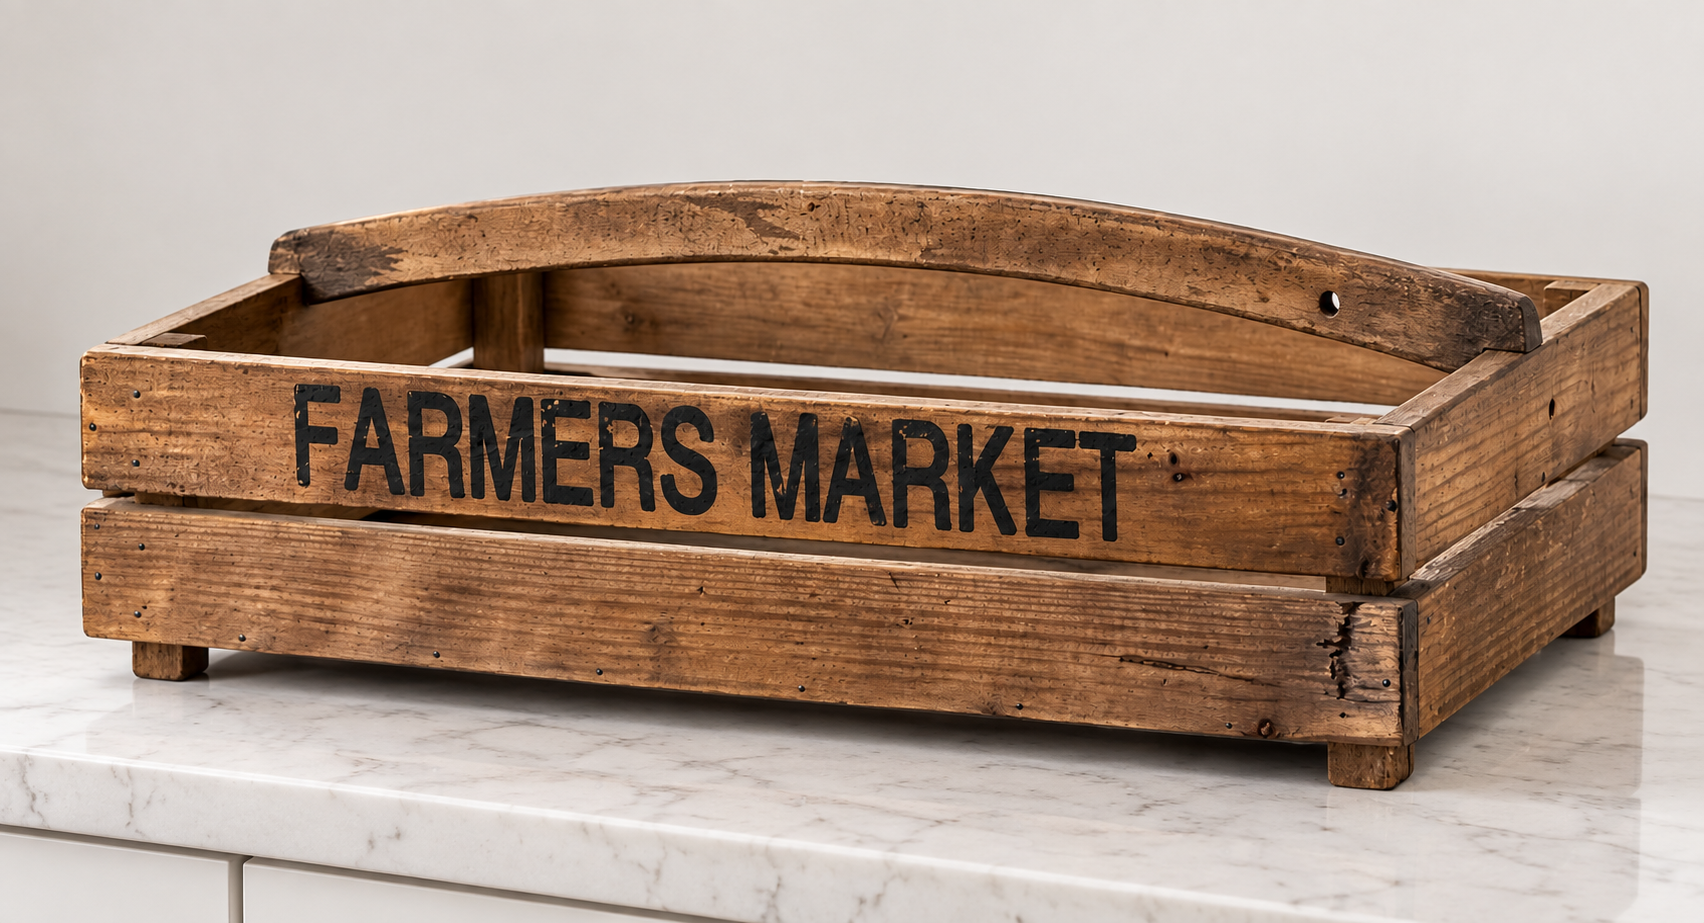
Both have been popular for a long time, especially when it comes to farmhouse and rustic home décor. But what makes this particular crate different is the design. Instead of your typical wooden crate, the corner supports extend through the bottom to create little legs. Then they've added this really cool arched wooden handle across the top.
And honestly, that handle is what sets the entire thing off. Now we're not just looking at another ordinary wooden box. We've got something that looks like an old-fashioned farmer's market basket.
Why This Could Be a Great Seller
One of the biggest advantages of a project like this is its versatility. Think about all the different ways someone could use it. They could fill it with decorative greenery, display seasonal decorations, use it as a centerpiece, or place it on an entryway table. And since it's got that arched handle, it has a completely different appearance from the typical wooden crates you see everywhere.
The retail version is approximately 20 inches long and 12 inches wide, and the store is asking around $80 for it.
Now, I think that's a pretty impressive price for something that could potentially be made using inexpensive pine, fence pickets, or reclaimed lumber. Depending on your materials, I'd estimate you could build one for around $5. Personally, I'd be looking at selling these somewhere around $50–$60, depending on the finish and what my local customers are willing to pay. 33That's a pretty interesting opportunity.
The Customization Potential
This is another project where I'd experiment with several different looks.
You could try a dark walnut stain to give it that old-fashioned appearance. Or maybe a distressed white finish for a farmhouse look. You could even leave the wood natural.
And then there's the lettering. The store-bought version has Farmers Market written across the handle. If you've got a laser engraver, you could personalize these with names, sayings, or custom designs. Don't have a laser? Use a stencil and paint. But I'll tell you something else.
I actually think these might look better without any lettering at all.
Sometimes the most authentic-looking rustic pieces are the simplest ones.
Project 2: Oversized Primitive Serving Tray
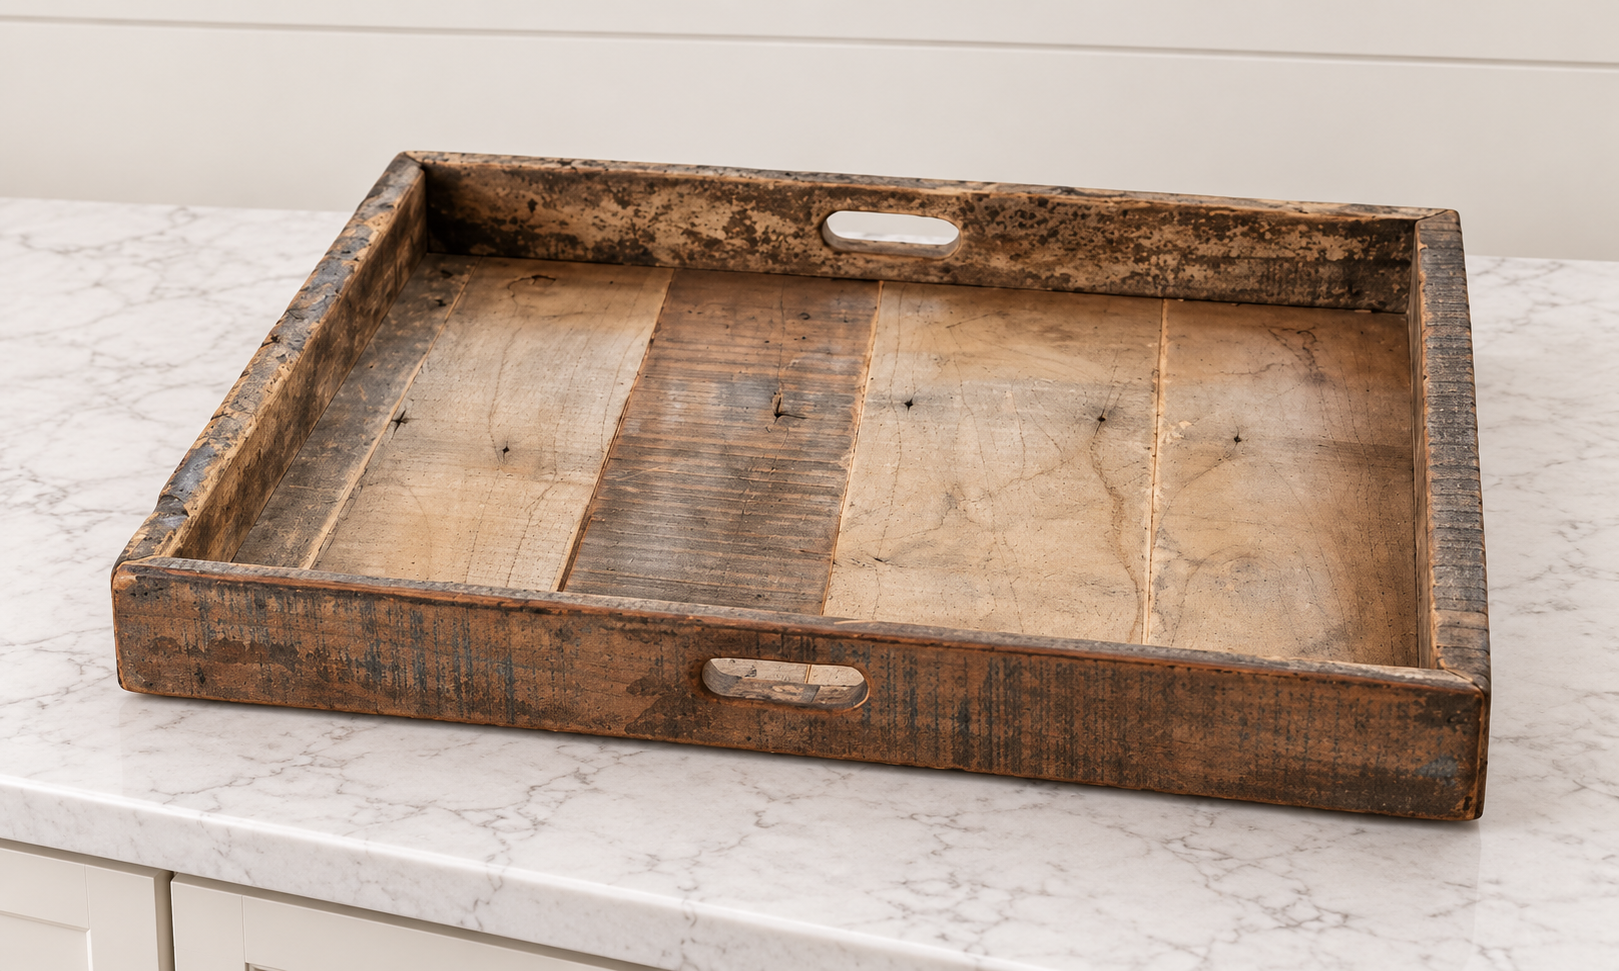
Most serving trays are rectangular. This one is a perfect square. And it's not some little tray, either. We're talking about a massive 24" × 24" tray that's approximately 3 inches deep. That's a pretty substantial piece. Sometimes something as simple as changing the proportions of an ordinary product is enough to make it stand out.
Why Customers Might Love This One
The first thing I'd think about is how somebody could use it in their home. Picture this sitting on a large kitchen island. Maybe they've got a couple of candles, some greenery, and a few decorative pieces arranged inside. Or imagine it sitting on a big farmhouse dining table.
The oversized square design gives people room to create an entire centerpiece. And that's what makes this different from a typical serving tray. We're not just selling a tray. We're selling a way to decorate a space.
The store-bought version is listed around $144. Now, personally, I think that's pushing it. Depending on your material source, you could potentially build one for around $5. I'd be more interested in trying to sell them around $50–$60, then seeing how my customers respond.
Rustic Finishes Are the Selling Point
For this particular design, I wouldn't try to make it look brand new. I'd actually go in the opposite direction. If you've got reclaimed lumber or pallet wood, this would be a great project for it. If you don't, fence pickets could work just fine. And don't be afraid to leave a little character in the wood.
Different grain patterns, old nail holes, distressed edges, and uneven stain absorption can all help create that aged appearance. You can even add some artificial wear to new lumber. The idea is to make it look like something that's been around for years. But here's one thing I'd avoid:
Making every single tray look exactly the same.
With primitive décor, those little differences are part of the appeal.
Project #3: Crate-Style Paper Towel Holder
This next one might seem a little strange at first…It's a paper towel holder. But not just any paper towel holder.
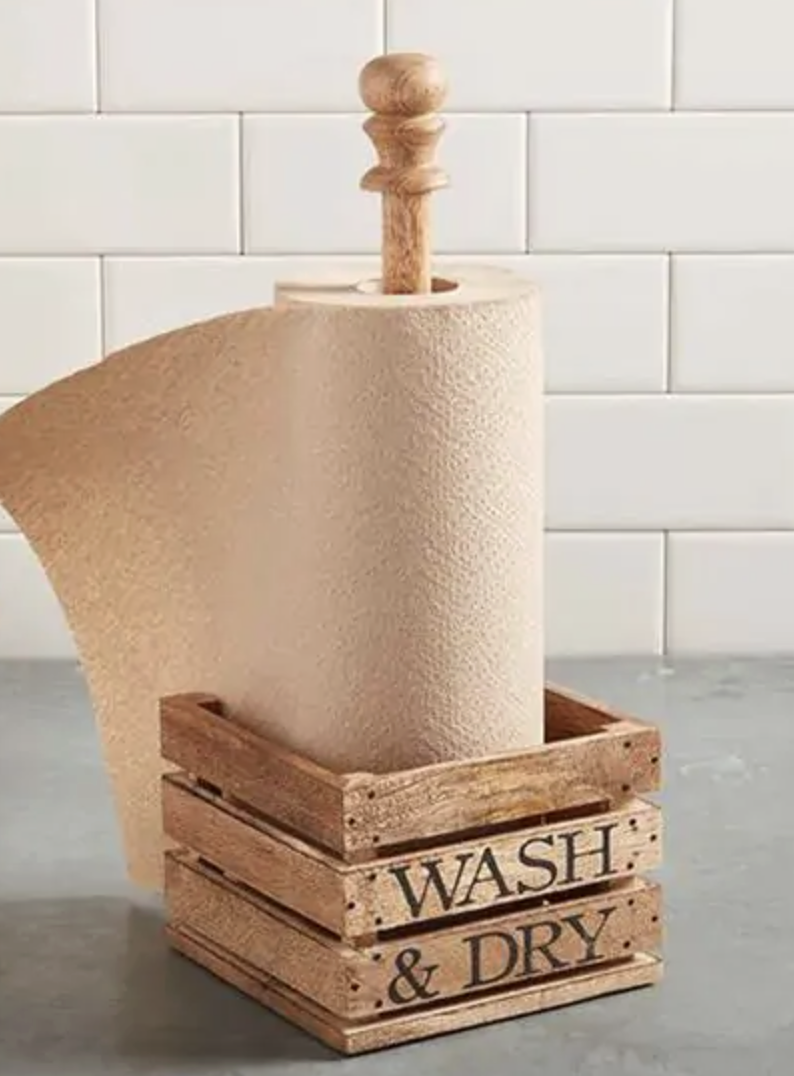
It's a paper towel holder designed to look like a miniature wooden crate.
Now, before you dismiss this one, let me tell you something. One of my best-selling projects in the past was a paper towel holder that looked like a little picnic table. Seriously. People love themed products, especially when they're affordable and serve a purpose. And that's why I think this one deserves some attention.
Why This Could Be a Smart Seller
Every kitchen needs a paper towel holder. That's the practical side of it. But most paper towel holders are just plain metal or plastic. There's nothing particularly interesting about them.
This one is different because it turns an ordinary kitchen accessory into something that matches a farmhouse or rustic decorating style. The retail design measures approximately 6" × 6" and 13 1/2" tall. And the store is asking around $44. Personally, I'd be looking at producing these efficiently and selling them somewhere around $25 each.
That's the type of smaller product that could work really well at craft shows or in a collection of rustic kitchen accessories.
Make Yours Better Than the Store-Bought Version
Here's something I noticed about the original design. It looks a little flimsy and that's not something I'd want to sell. If somebody grabs a paper towel and pulls, the entire thing shouldn't feel like it's about to fall apart.
So if I were making these, I'd use a thicker wooden base and make sure the center dowel was securely attached. I'd also simplify the decorative topper. Instead of buying some fancy little finial, I'd probably use a simple wooden block that matches the crate design. That would give it a cleaner look while keeping the cost down. And that's something worth remembering when you're looking at store-bought products.
You don't have to recreate every detail. Sometimes you can improve the design.

Project 4: Wooden Spice Holders
Now this one is a perfect example of why I always tell woodworkers to think twice before throwing away their scraps. When I first saw these, I wasn't even sure what they were. But once I figured it out, I immediately thought:
That's pretty cool. And we could definitely sell those.
They're little wooden holders designed for salt, pepper, or other seasonings. And there's almost nothing to them. The design is basically a small block of hardwood with two recessed openings and a pair of little wooden spoons, but the finished product looks great.
Sell Them Alone or Use Them as an Upsell
Here's where I'd get creative. You could absolutely sell these as individual products.Make some from walnut. Some from cherry. Some from maple. Experiment with different shapes and finishes. But I think there's another opportunity here.
Bundle them with your cutting boards.
Let's say somebody buys a nice handmade cutting board. Now you can offer a matching wooden spice holder or create a complete kitchen gift set.
That's how you start increasing the value of each sale without necessarily having to find more customers. And you don't need to spend all afternoon carving little wooden spoons, either. You can buy inexpensive miniature wooden spoons and include them with the finished product.
Why I'd Add This to a Selling Collection
This is exactly the type of project I'd want in my inventory if I were already producing hardwood kitchen accessories. It requires very little material. It gives me a way to use scraps. It complements products that are already popular. And it could be a great add-on purchase.
Sometimes the best new product isn't something completely different. Sometimes it's something that makes your existing products even more appealing. One thing I'd keep in mind: if you're selling these for actual food or spice storage, use food-safe materials and finishes appropriate for that purpose.
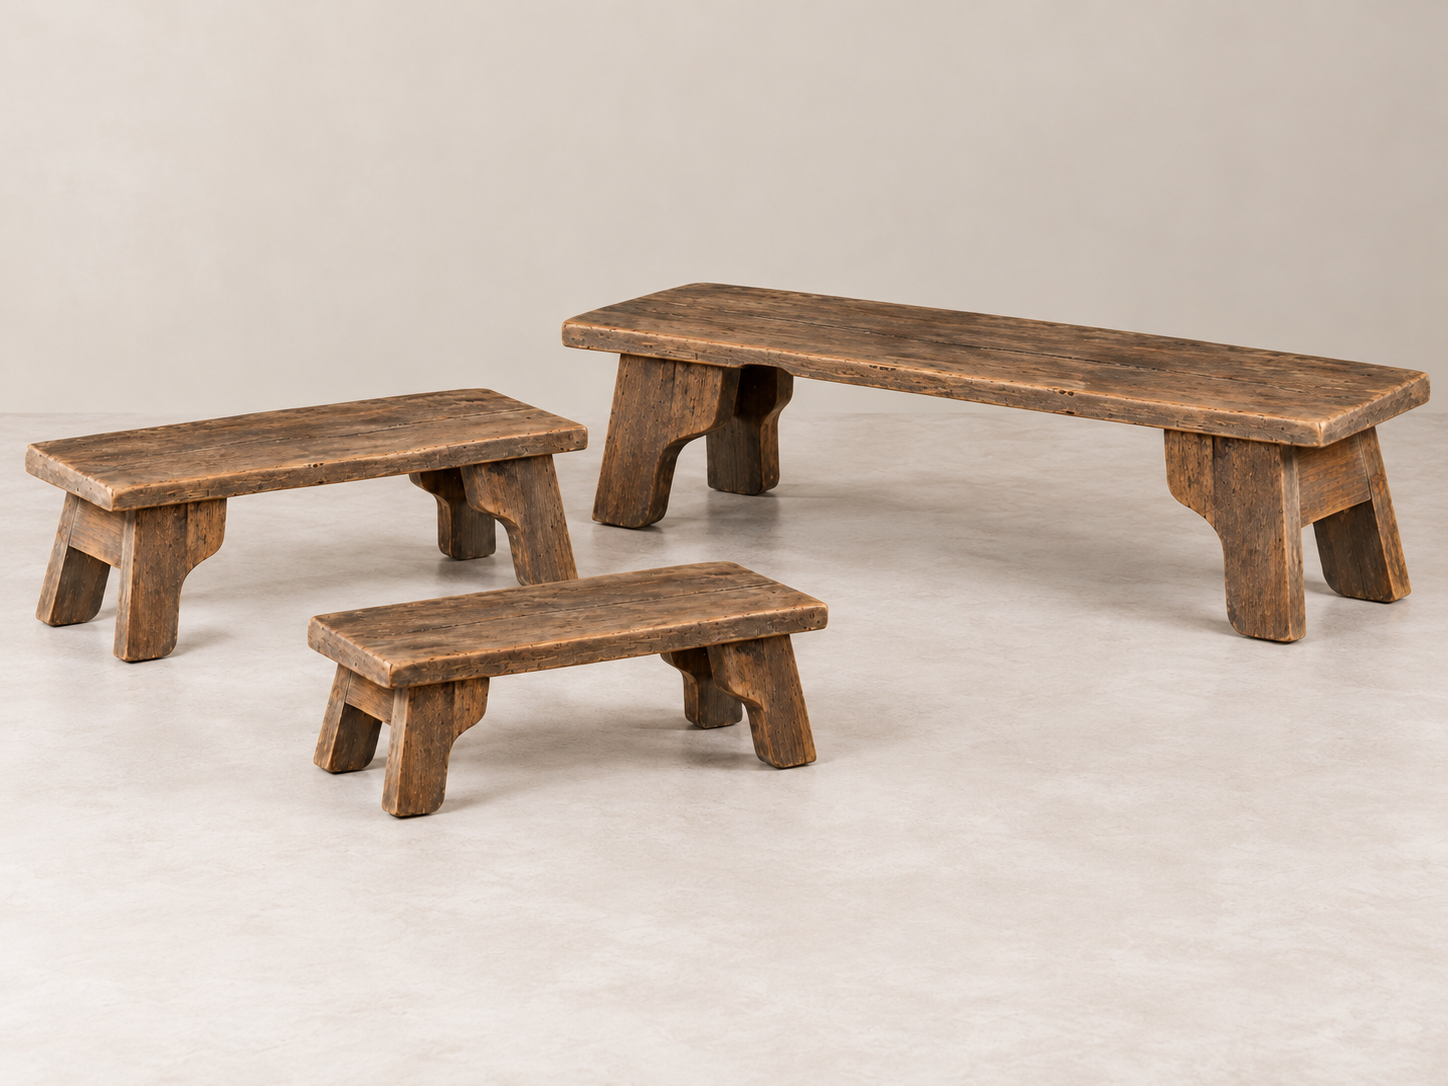
Project 5: Colonial Farmhouse Footed Riser
Now let's talk about a product that has become incredibly popular in home décor. Wooden risers. I'll be honest with you, when these things first started showing up everywhere, I wasn't exactly sure what people were using them for. But once you start looking at how they're staged, it makes sense. They're used to add height and dimension to decorative displays.
Put one on a kitchen counter, dining table, or entryway table, and suddenly the decorations sitting on top of it become more noticeable. And people love that.
What Makes This Riser Different?
The particular riser we're looking at is a colonial farmhouse style. And the big thing that sets it apart is the feet. Instead of using ordinary square blocks underneath a board, this one has decorative contoured legs that flare outward slightly. That little design feature makes it look more like a miniature bench.
The retail version measures approximately 32" long × 7 1/2" wide × 7 1/2" tall. And they're asking around $70 for it. Now, here's the interesting part. Depending on your material costs, you could potentially build one for less than $5. Personally, I'd be looking at selling these around $35–$40, depending on the finish and the market.
That's a pretty attractive opportunity for a relatively simple woodworking project.
Don't Just Make One Size
Here's where I think you could really turn this into something interesting. Make several sizes. Instead of offering only one 32-inch riser, why not offer:
A small riser
A medium riser
A large riser
Now customers can purchase one or create an entire matching display. And you can experiment with different finishes. Natural wood, Distressed White, Dark walnut, Black, Two-Tone…The possibilities are pretty wide open.
Put Your Own Spin on the Legs
Another thing I like about this project is that you can change its appearance without completely redesigning the build. Those decorative legs are really what give the riser its personality. Change the contour slightly, adjust the angle, or use a different leg arrangement, and suddenly you've got a completely different-looking product.
That's the kind of creativity I want you to start experimenting with. Don't just look at a product and think:
"How can I make that exact same thing?"
Instead, you should think:
"What could I change to make my version different?"
Ready To Build?
Now that we've looked at all five, here's what I want you to think about. We're not just looking for five random things to make. We're looking for ways to build a better woodworking product collection. And each of these projects brings something different to the table.
But here's the most important thing. Don't just build something because I think it's a good idea. Look at your customers. Look at what they're already buying. If you sell a lot of cutting boards, maybe those spice holders are the perfect next product. If your customers love farmhouse décor, maybe you should be making crates, trays, and risers. If you sell kitchen accessories, that paper towel holder could be a great addition. And if you find something that works, don't be afraid to make several versions.
And remember, you don't have to copy these store-bought products exactly. Put your own creative twist on them. Every time you change a design, try something new, or figure out a better way to build something, you're growing as a woodworker. So pick a project, head out to the shop, and see what you can come up with.
You know what time it is.
👉 Get up, get out, and get your build on.
Whether you’re new to woodworking or a seasoned pro, this project offers the perfect mix of functionality and creativity. Below I have the YouTube video linked for a step-by-step video tutorial for you to follow along with. If you’re a more “plans in the hand” person, click “Get Plan” down below for downloadable instructions. And if you’re ready to dive deeper into woodworking, check out my new course, “Woodworking Kickstart” (which is also linked below). It’s packed with step-by-step lessons to help you build confidence and skills, whether you’re a total beginner or an experienced DIYer. You’ll be building with confidence in no time.
Remember, creativity doesn’t have to be expensive; all you need is a little inspiration and a willingness to try.
Get Easy Step-By-Step Directions to build this by clicking the button below
⭐ 10,044 5 Star Reviews
📚 113 Plans to Choose From
🧩 Lego-Like Assembly Steps
📏 Exact Measurements
📋 Detailed cut and part list
🔍 X-Ray Views
🚀 Instant Delivery
