
DIY Transforming Storage Shelf 2.0
Multi-Purpose Transforming Shelf
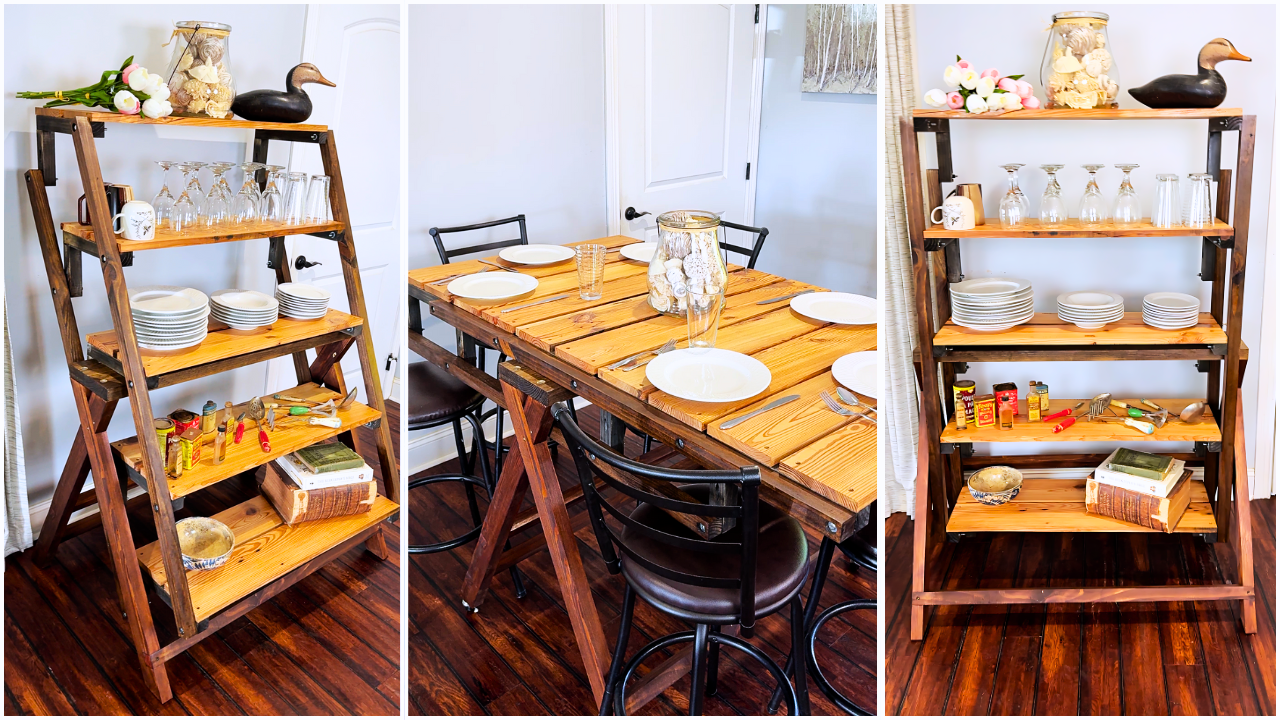
I’ve got something awesome for you today—a transforming table that flips into a shelf! It’s perfect for small spaces, outdoor plant stands, or just showing off to your friends. I’m gonna walk you through this build like we’re hanging out in my workshop, problem-solving and having a good time. Let’s get to it! For a visual, make sure to check out the linked YouTube video as well.
Material Needed
Construction-grade lumber (pine works great):
2x4s for legs (at least 12 ft total)
1.5” x 1.5” stock (about 40 ft for supports and arms)
2x10 for the main brace (42” long, 8” wide)
3/4” or 1” pine boards for shelves (5 pieces, 35.5” long, ~6” wide each)
Hardware:
10 quarter-inch bolts (3.5” long)
10 quarter-inch lock nuts
30 flat washers (quarter-inch)
4 quarter-inch x 3” lag screws
2.5” screws for shelf attachment
1” screws for temporary assembly
2 spring locking pins (optional, for locking mechanism)
Finishing:
Pre-stain conditioner (for pine)
Gunstock stain
Dark walnut stain (for stain stacking)
Clear finish (optional)
Tools:
Table saw, miter saw, or circular saw
Drill with 1/4” and 3/4” bits (Forstner or spade)
Countersink bit
Clamps
Straight edge
Measuring tape
Pencil
Sandpaper
Stain pads or sponges
Optional: pocket hole jig, drill guide, bench dogs
Time To Bring Your Transforming Shelf To Life

Step 1: Prep Your Legs
Let’s start with the legs. You’re gonna need four legs, each 37 inches long, made from 2x4s that are 2.75 inches wide. Here’s how to do it:
Rip off one rounded edge of your 2x4 to get a flat surface for your saw’s fence.
Cut the 2x4 to 2.75” wide.
Trim each leg to 37” long.
Lay out two legs side by side, ensuring the outside edges are 30” apart at the bottom (this sets your base width). The tops should be 8” apart.
Mark a 27-degree angle at each end using a straight edge (I just use the table’s edge and a pencil). Cut these angles on your miter saw.
Pro Tip: Double-check your angles with the saw itself—it’s quicker than fancy angle finders!
Step 2: Cut Half Laps for Leg Connections
We’re gonna join the legs with half laps for a sturdy base. Each leg gets a half lap at the top.
Set your saw blade to 3/4” deep (since your material is 1.5” thick).
Measure 5.5” down from the top angled cut and mark your half lap.
Set your miter saw to 37 degrees and cut the half lap, making multiple passes to remove 3/4” of material. You can use a table saw or circular saw if you prefer.
Repeat for all four legs.
Heads Up: If you’re using a miter saw, add a block behind the leg to ensure the blade cuts the full depth.

Step 3: Notch the Legs for Support Braces
We need notches to hold the leg supports. These will make the structure rock-solid.
Mark notches at 4” up from the bottom on all four legs (front and back).
For the back two legs, add a second notch with the bottom at 12” up.
Each notch is 1.5” wide x 1.5” deep (to match your 1.5” x 1.5” support stock).
Set your table saw blade to 1.5” high and cut the notches by making multiple passes. You can also use a miter saw, jigs saw, or hand saw.
Step 4: Cut Leg Supports and Main Brace
Time to cut the pieces that tie everything together.
Leg Supports: Cut three 1.5” x 1.5” boards to 42” long for the back (two) and front (one) supports.
Main Brace: Cut a 2x10 to 42” long and 8” wide for the top support.
Test-fit the leg supports in the notches. If they’re tight, sand or shave a tiny bit off the notch edges for a snug fit.

Step 5: Build the Arm Assemblies
The arms are what make this table transform. We’re making 10 L-shaped arms (12” and 6” pieces) and four arm supports.
Arm Supports: Cut four 1.5” x 1.5” boards to 53.5” long. Pick the straightest wood you’ve got!
Arms: Cut 10 pieces at 12” and 10 at 6” from 1.5” x 1.5” stock.
Drill pocket holes on two sides of each 6” piece using a pocket hole jig.
Attach each 6” piece to a 12” piece to form an L-shape using 1” screws. Clamp them down to keep things steady.
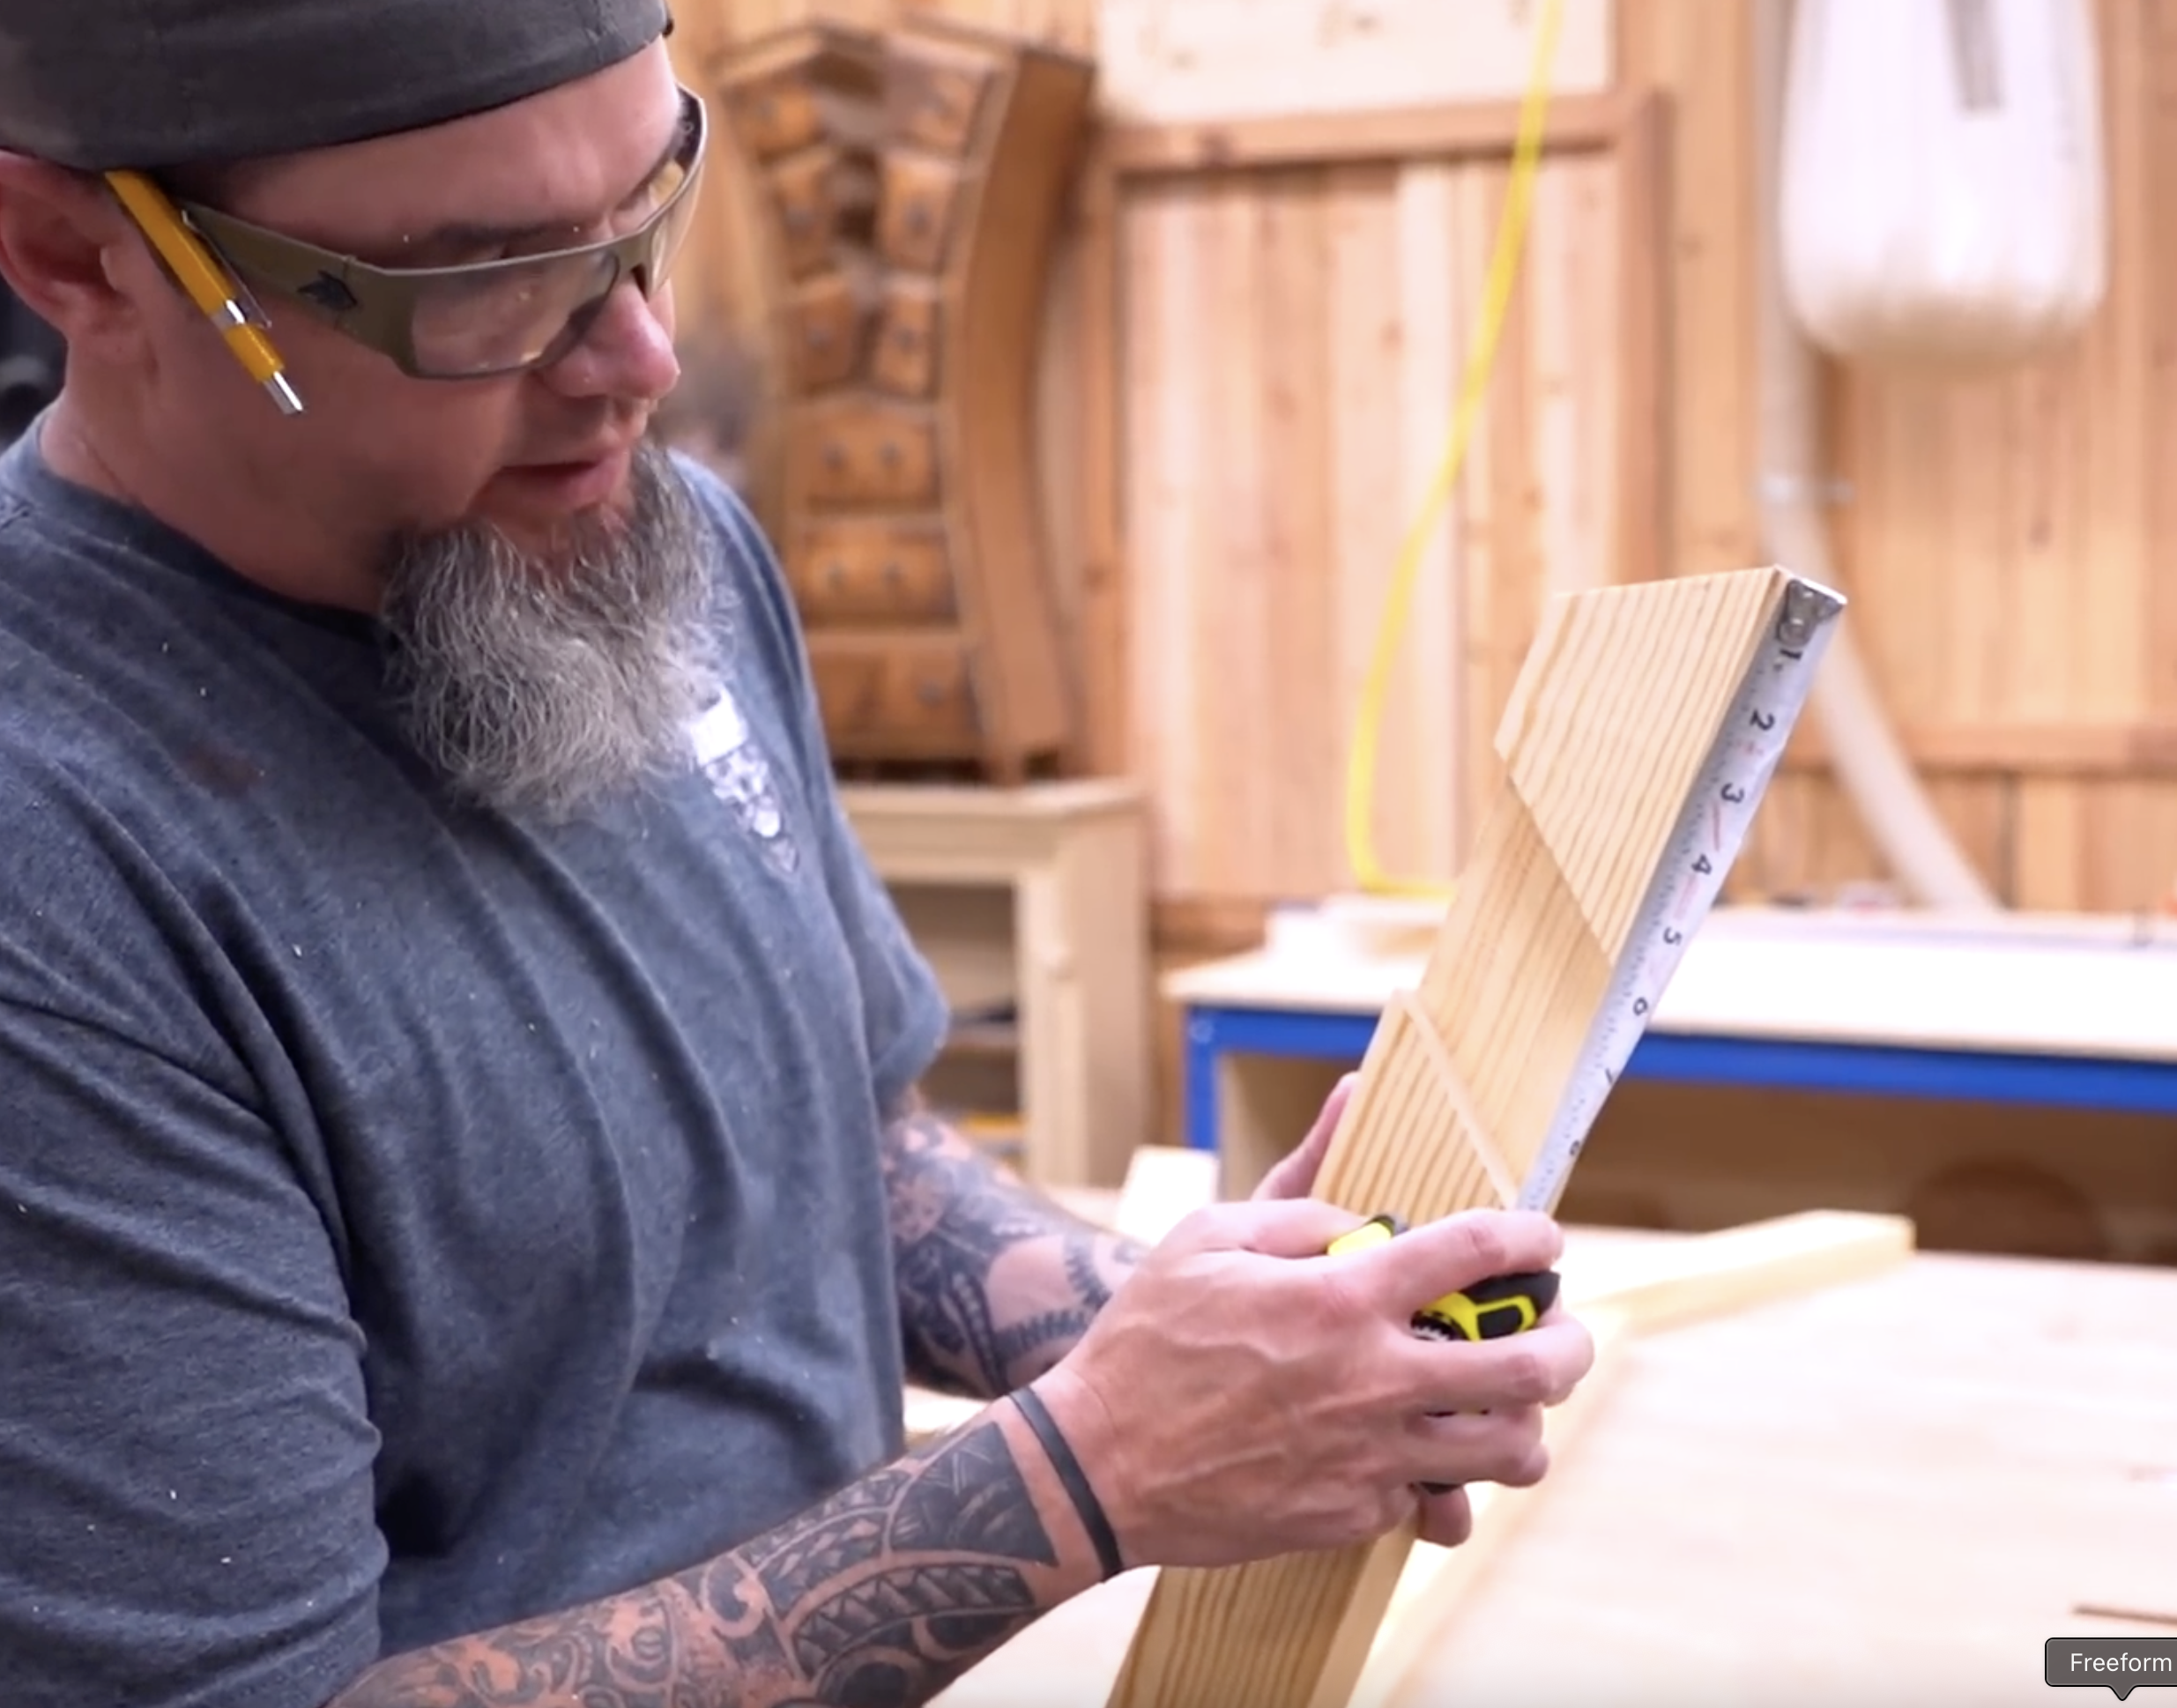
For pivot points on the arm supports, mark at 3/4”, 13 3/4”, 26 3/4”, 39 3/4”, and 52 3/4” down, then 3/4” in from the edge.
Counterbore each mark with a 3/4” Forstner or spade bit (deep enough for a bolt head and socket). Drill a 1/4” hole through the center using a drill guide for precision.
Repeat for all four arm supports, using the first as a template.
Pro Tip: Make a simple jig from scrap plywood to ensure consistent pivot hole placement.

Step 6: Stain Everything
Pine can get blotchy, so let’s make it look good.
Sand all pieces smooth.
Apply pre-stain conditioner to prevent blotchiness.
Stain with gunstock stain. If it’s too red (like mine was), layer dark walnut stain on top and wipe it off quickly for an amber look.
Stain arm supports slightly darker and arms even darker for contrast.
Let everything dry completely.

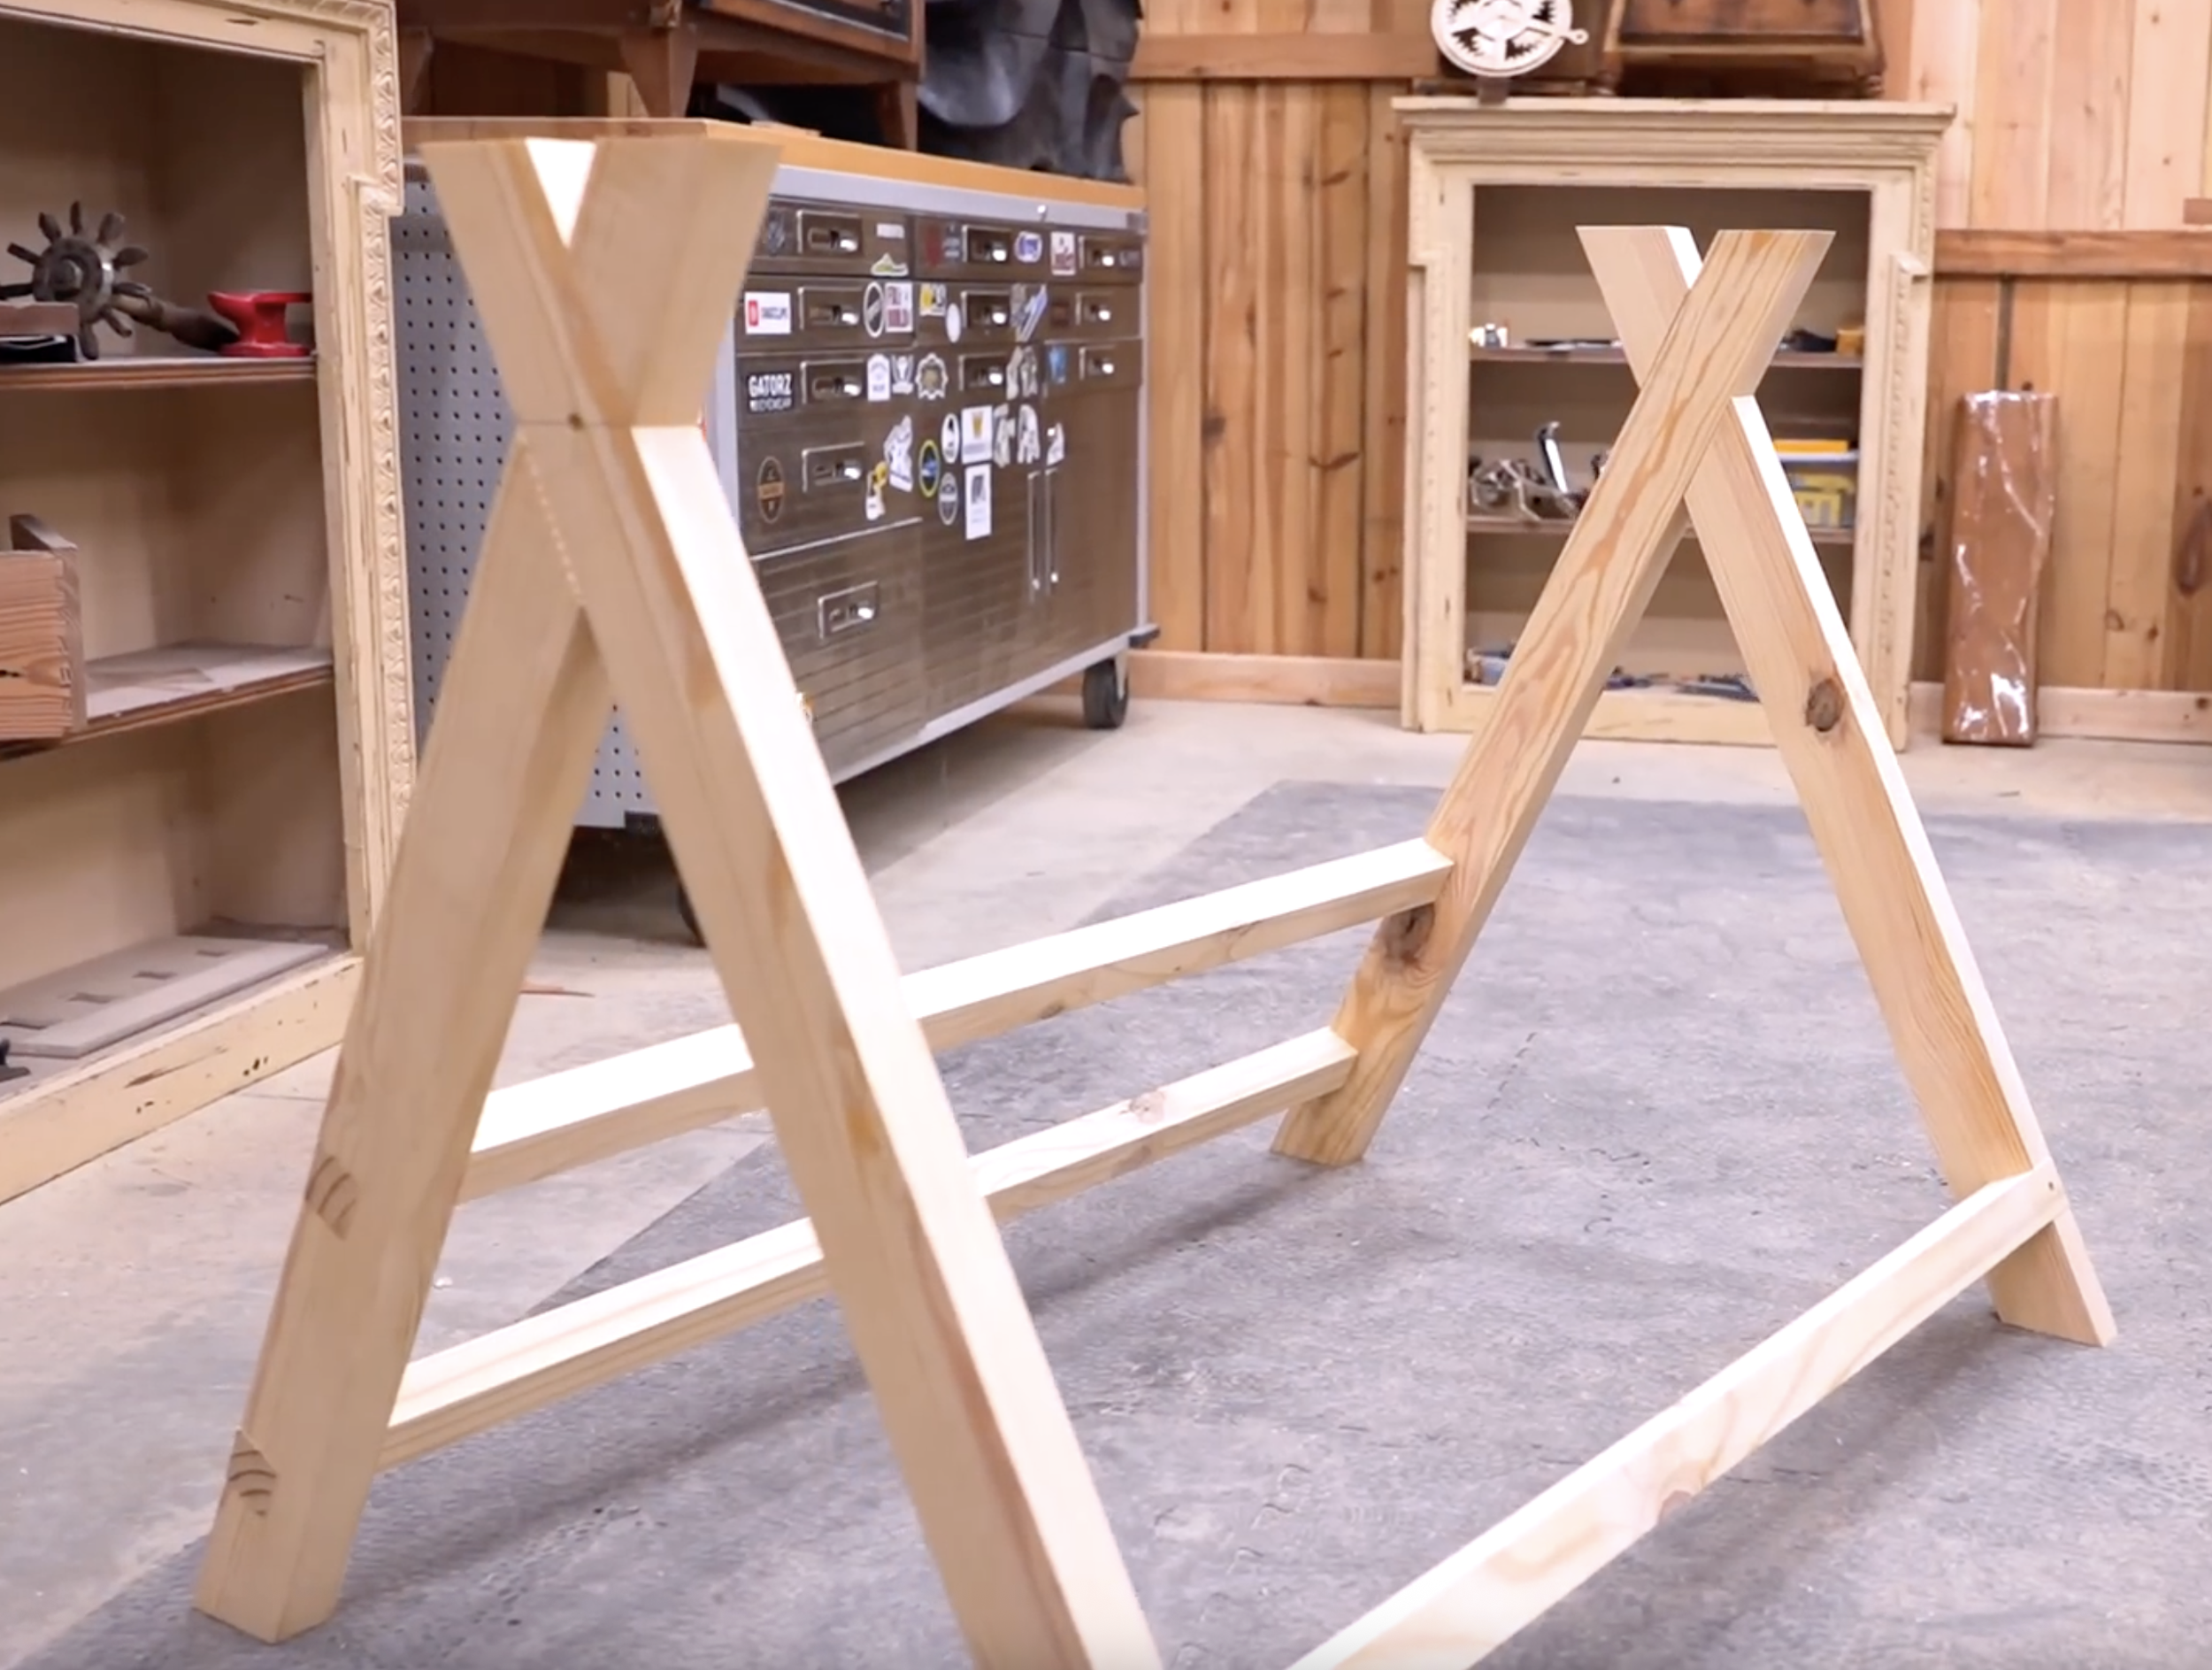
Step 7: Assemble the Base
Now, let’s put the base together.
Fit the 42” leg supports into the notches. Use 1” screws temporarily to hold them (we’ll glue later).
Check that the top and bottom distances match (42” apart). Adjust notches if needed.
Join the legs at the half laps with 1” screws (glue and dowels come later).
Attach the main brace to the top of the legs using four 1/4” x 3” lag screws. Measure 2” in from the edge and 3/4” from the side for placement, then counterbore and pre-drill.

Step 8: Attach Arm Assemblies
Here’s where the magic happens.
Divide the four arm supports into two pairs. For each pair, insert a 3.5” bolt with a washer through each pivot hole, then add another washer and an arm (6” piece first).
Ensure arms are on the inside of the supports, with the 12” piece aligned with the support’s edge.
Add a third washer and a lock nut to each bolt. Tighten until snug but not too tight—arms should pivot smoothly.
Test the mechanism. If it’s stiff, loosen the nuts slightly. Watch your fingers—it pinches!

Step 9: Install the Shelves
The shelves make it a table or a shelf.
Cut five pine boards to 35.5” long and ~6” wide. Plane and edge if using reclaimed wood.
Lay out the boards on the arms, flush with the edges, leaving a 1/2” gap between each (use spacers).
Start with the first and last boards. Measure 1” from each side and 3/4” into the arm’s center, then pre-drill and countersink for 2.5” screws.
Install the remaining boards the same way, ensuring even gaps.Pro Tips

Step 10: Add Locking Pins (Optional)
To lock the table/shelf in place:
Install a spring locking pin on each outer arm support where the lower arm intersects (flat position).
Add another pin above the main support into the bottom arm support (vertical position).
Alternatively, drill holes and use bolts for a budget-friendly lock.
Step 11: Final Touches
You’re almost there!
Disassemble, glue all joints, and reattach with screws. Cover screw holes with dowels for a clean look.
Apply a clear finish if desired.
Optional: Add casters to the base for mobility (shorten legs by 2” if needed).
Ready To Build?
Man, isn’t it cool how this thing flips from a table to a shelf? It’s like something out of a sci-fi movie, but you built it with your own hands! You can use it for plants, garage storage, or just to impress your buddies. If you hit any snags, tweak it like I did—sand a bit here, shave a bit there. Make it your own with different stains or materials.
Whether you’re new to woodworking or a seasoned pro, this project offers the perfect mix of functionality and creativity. If you’re a more “plans in the hand” person, click “Get Plan” down below for downloadable instructions. And if you’re ready to dive deeper into woodworking, check out my new course, “Woodworking Kickstart” (which is also linked below). It’s packed with step-by-step lessons to help you build confidence and skills, whether you’re a total beginner or an experienced DIYer. You’ll be building with confidence in no time.
Remember, creativity doesn’t have to be expensive; all you need is a little inspiration and a willingness to try.
Get Easy Step-By-Step Directions to build this by clicking the button below
⭐ 10,044 5 Star Reviews
📚 113 Plans to Choose From
🧩 Lego-Like Assembly Steps
📏 Exact Measurements
📋 Detailed cut and part list
🔍 X-Ray Views
🚀 Instant Delivery
