
DIY Rustic Cabin Bird Feeder Using Fence Pickets

Functional & Beautiful
I’m stoked to walk you through building a super cool cabin-style bird feeder using just fence pickets. It’s a fun, easy project that gives off those rustic vibes, and you don’t need a fancy workshop or years of woodworking chops to pull it off. Let’s dive in and get this thing built together!
Materials & Tools
Fence pickets (cedar or any scrap wood, about 5/8” to 3/4” thick)
Wood glue (exterior-grade works best)
Brad nails (1-1/4” or similar)
Exterior screws (1” long, for securing parts)
Wood stain (rustic brown for that cabin look, optional)
Sandpaper (medium grit, for rounding edges)
Hinge (small, for the access panel)
CA glue (optional, for quick assembly of small parts)
Tools: Table saw, miter saw, brad nailer, drill, speed square, sander or oscillating tool, jigsaw, clamps
Time To Bring Your Cabin Bird Feeder To Life

Step 1: Prep Your Lumber
Grab those fence pickets, my friend! If you’re like me and hoard scrap wood, dig through your pile. Otherwise, head to Lowe’s for some fresh pickets. Stain ‘em a rustic brown if you want that cozy cabin feel—no need to sand them super smooth; a rough look is perfect here.
Rip your picket down to 5-1/8” wide using a table saw. This gives us a nice, uniform size to work with.

Step 2: Cut Log-Like Grooves
To make it look like stacked logs without all the hassle, we’re gonna cut grooves into the board. Set your table saw blade to 1/8” high. Adjust the fence to:
5” for the first groove (cuts the edge).
4”, 3”, 2”, and 1” for subsequent grooves.
For the final groove, flip the board and set the fence back to 5” to cut the opposite edge.
You’ll end up with a board that looks like it’s made of small logs. Lightly sand the grooves with a sander or folded sandpaper to round the edges for that authentic cabin vibe.

Step 3: Cut the Side Panels
Now, let’s cut the pieces for the feeder’s walls:
2 boards at 14” long (for the long sides where feed comes out).
2 boards at 10” long (for the front and back).
To get that interlocking log cabin look, we need to notch the ends. For the 10” boards (front/back):
Mark the bottom log and every other log up to the top, measuring 1” in from each end.
Mark the gaps between logs for removal.
Use a table saw or jigsaw to cut out these 1” sections, keeping cuts straight and at the same depth (use a speed square as a guide).
Use one cut board as a template to mark the 14” boards. Cut out the material behind the protruding logs, ensuring the notches align when assembled.

Step 4: Assemble the Walls
Time to put it together! Lay out the notched boards to form a rectangular box, with the 10” boards as front/back and 14” boards as sides. Apply wood glue sparingly to the notched areas (avoid glue on protruding parts). Secure with brad nails using a nailer—go easy, we want it sturdy but clean. Clamp it up and check for square while the glue dries.

Step 5: Build the Gables
For the roof supports, cut two 10” gables from the same picket material. Set your miter saw to 45 degrees and cut each end to form a peaked shape. Attach the gables to the top of the box using pocket holes (two per gable) or wood glue and screws. Make sure the gable tips align with the edges of the 10” boards.

Step 6: Add Roof Supports
Cut four 1” wide strips (about 12” long, adjust to fit between gables). These go between the gables on both sides to support the roof. Custom-cut each strip to match the gable’s angle. Secure with wood glue and brad nails, keeping the nailer flat to avoid blowouts.

Step 7: Install the Roof
For the roof, cut:
Three 9” boards (for the top layer).
Three 8-1/2” boards (for the bottom layer).
Start with the 8-1/2” boards, attaching them to the gable supports with wood glue and brad nails. Ensure a 1” overhang on each side and keep them flush with the gable tops. For the back, make an access panel:
Attach two 9” boards with glue and nails.
For the third 9” board, cut a 1/8” deep notch in the center for a hinge (use a chisel or oscillating tool). Attach the hinge to the board and the feeder for easy refilling.
Overlap the 9” boards over the 8-1/2” boards, securing with glue and nails. Add a few brad nails along the sides for extra support, avoiding the hinged board.

Step 8: Build the Base
Cut three 20” long boards (5” wide) for the base. I used cedar for a contrasting color. Join them with two 1” strips (about 13” long), placed 2-1/2” from each edge, using wood glue and brad nails. This keeps the base sturdy and warp-free.

Step 9: Add Seed Strips
o keep seed from spilling, cut:
Two 20” strips (for the base’s long sides).
Two 13” strips (for the short sides).
One extra 13” strip (back spacer).
Two 5” strips (front spacers).
Place the 20” and 13” strips around the base’s perimeter, securing with brad nails. For the feeder’s undercarriage:
Position the extra 13” strip against the back and the two 5” strips 5” from the front edge.
Loosely place the feeder on top, centering it. Apply wood glue to the strips’ edges, then secure to the feeder (not the base) with brad nails and 1” screws (pre-drill at 2-1/2” and 4-1/2” on the 5” strips, and similar for the 13” strip).
Attach the feeder to the base with four 1” screws (one in each corner of the strips, 2” in), pre-drilling to avoid splitting. This setup lets you lift the feeder off for cleaning.
Step 10: Add Final Touches
Now, let’s get creative! Here’s what I did, but feel free to make it your own:
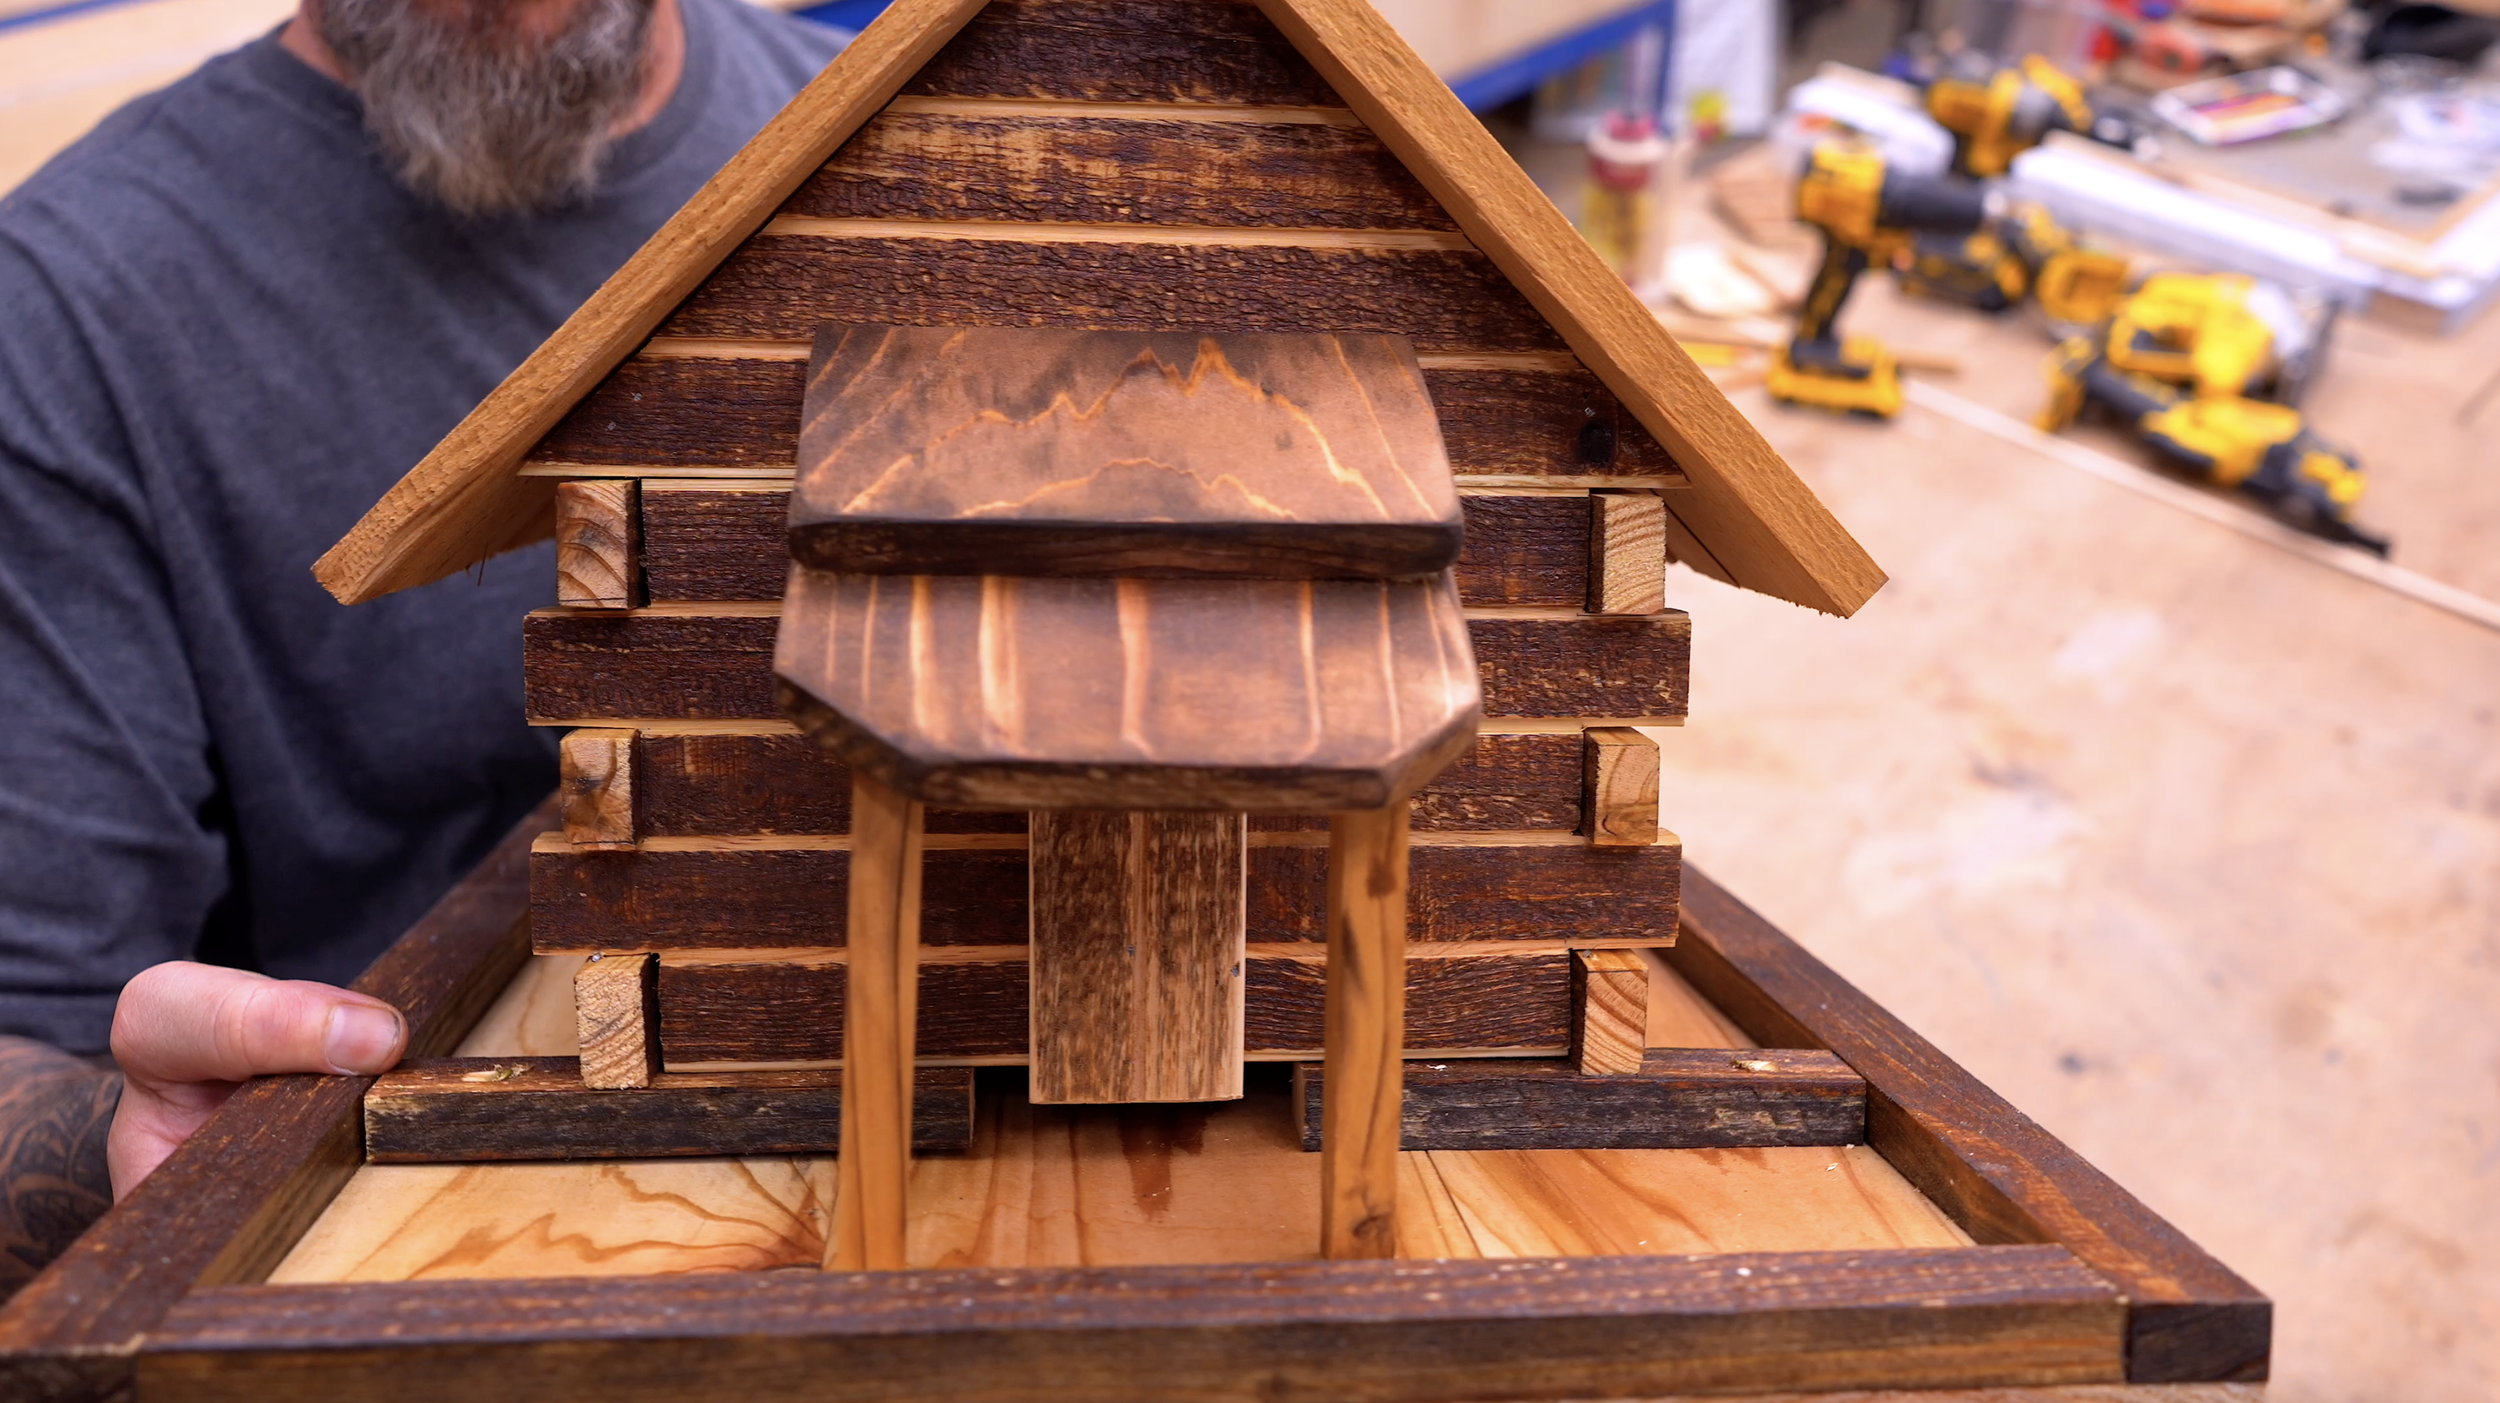
Door: Cut a 2” x 4” piece from a picket, with vertical grooves. Glue a small block in the center to avoid blocking feed, then attach with brad nails.
Porch: Cut a 4-1/2” piece at a 30-degree angle on both ends. Stack a 3” piece (same angle) on top. Attach with wood glue or CA glue. Add two 4-1/2” posts (1/2” x 1/2” strips, cut at 30 degrees), securing with CA glue 3/4” in and 1-1/2” from the end.
Window: Use a scrap sliver (about 1” x 2”) and attach with CA glue on the back or sides.
Chimney: Cut a 2” x 2” scrap into a 2” piece, notching a V-shape with 45-degree cuts using a jigsaw. Wrap a thin picket scrap around the top and attach with CA glue.
Lightly stain the porch for a matching look, if you want.
Step 11: Mount (Optional)
If mounting on a post, don’t glue the porch posts. Remove the four base screws, secure the base to the post, then reattach the feeder.
Ready To Build?
You’ve got a rustic cabin bird feeder that’s ready to welcome some feathered friends. Fill it up through the hinged panel, and watch the birds flock to your masterpiece. If you’re looking to sell these, you should find no trouble at all. Bird watching is a hobby for over 96,000,000 people in the United States, think of all the customers!
Whether you’re new to woodworking or a seasoned pro, this project offers the perfect mix of functionality and creativity. If you’re a more “plans in the hand” person, click “Get Plan” down below for downloadable instructions. And if you’re ready to dive deeper into woodworking, check out my new course, “Woodworking Kickstart” (which is also linked below). It’s packed with step-by-step lessons to help you build confidence and skills, whether you’re a total beginner or an experienced DIYer. You’ll be building with confidence in no time.
Remember, creativity doesn’t have to be expensive; all you need is a little inspiration and a willingness to try.
Get Easy Step-By-Step Directions to build this by clicking the button below
⭐ 10,044 5 Star Reviews
📚 113 Plans to Choose From
🧩 Lego-Like Assembly Steps
📏 Exact Measurements
📋 Detailed cut and part list
🔍 X-Ray Views
🚀 Instant Delivery
